False Positive Management
False positive management allows analysts to suppress known benign alerts so they no longer surface in future detections. This reduces noise and lets the team focus on genuine threats.
RhythmX provides three approaches to false positive management: manual marking from the investigation workflow, frequent alert review for bulk triage, and AI-powered suggestions that automatically identify likely false positives.
Navigating to False Positive Management
From the Security Control Center
To access the False Positive Management console, navigate back to the Security Control Center by clicking the Control Center button in the top navigation bar from any page.
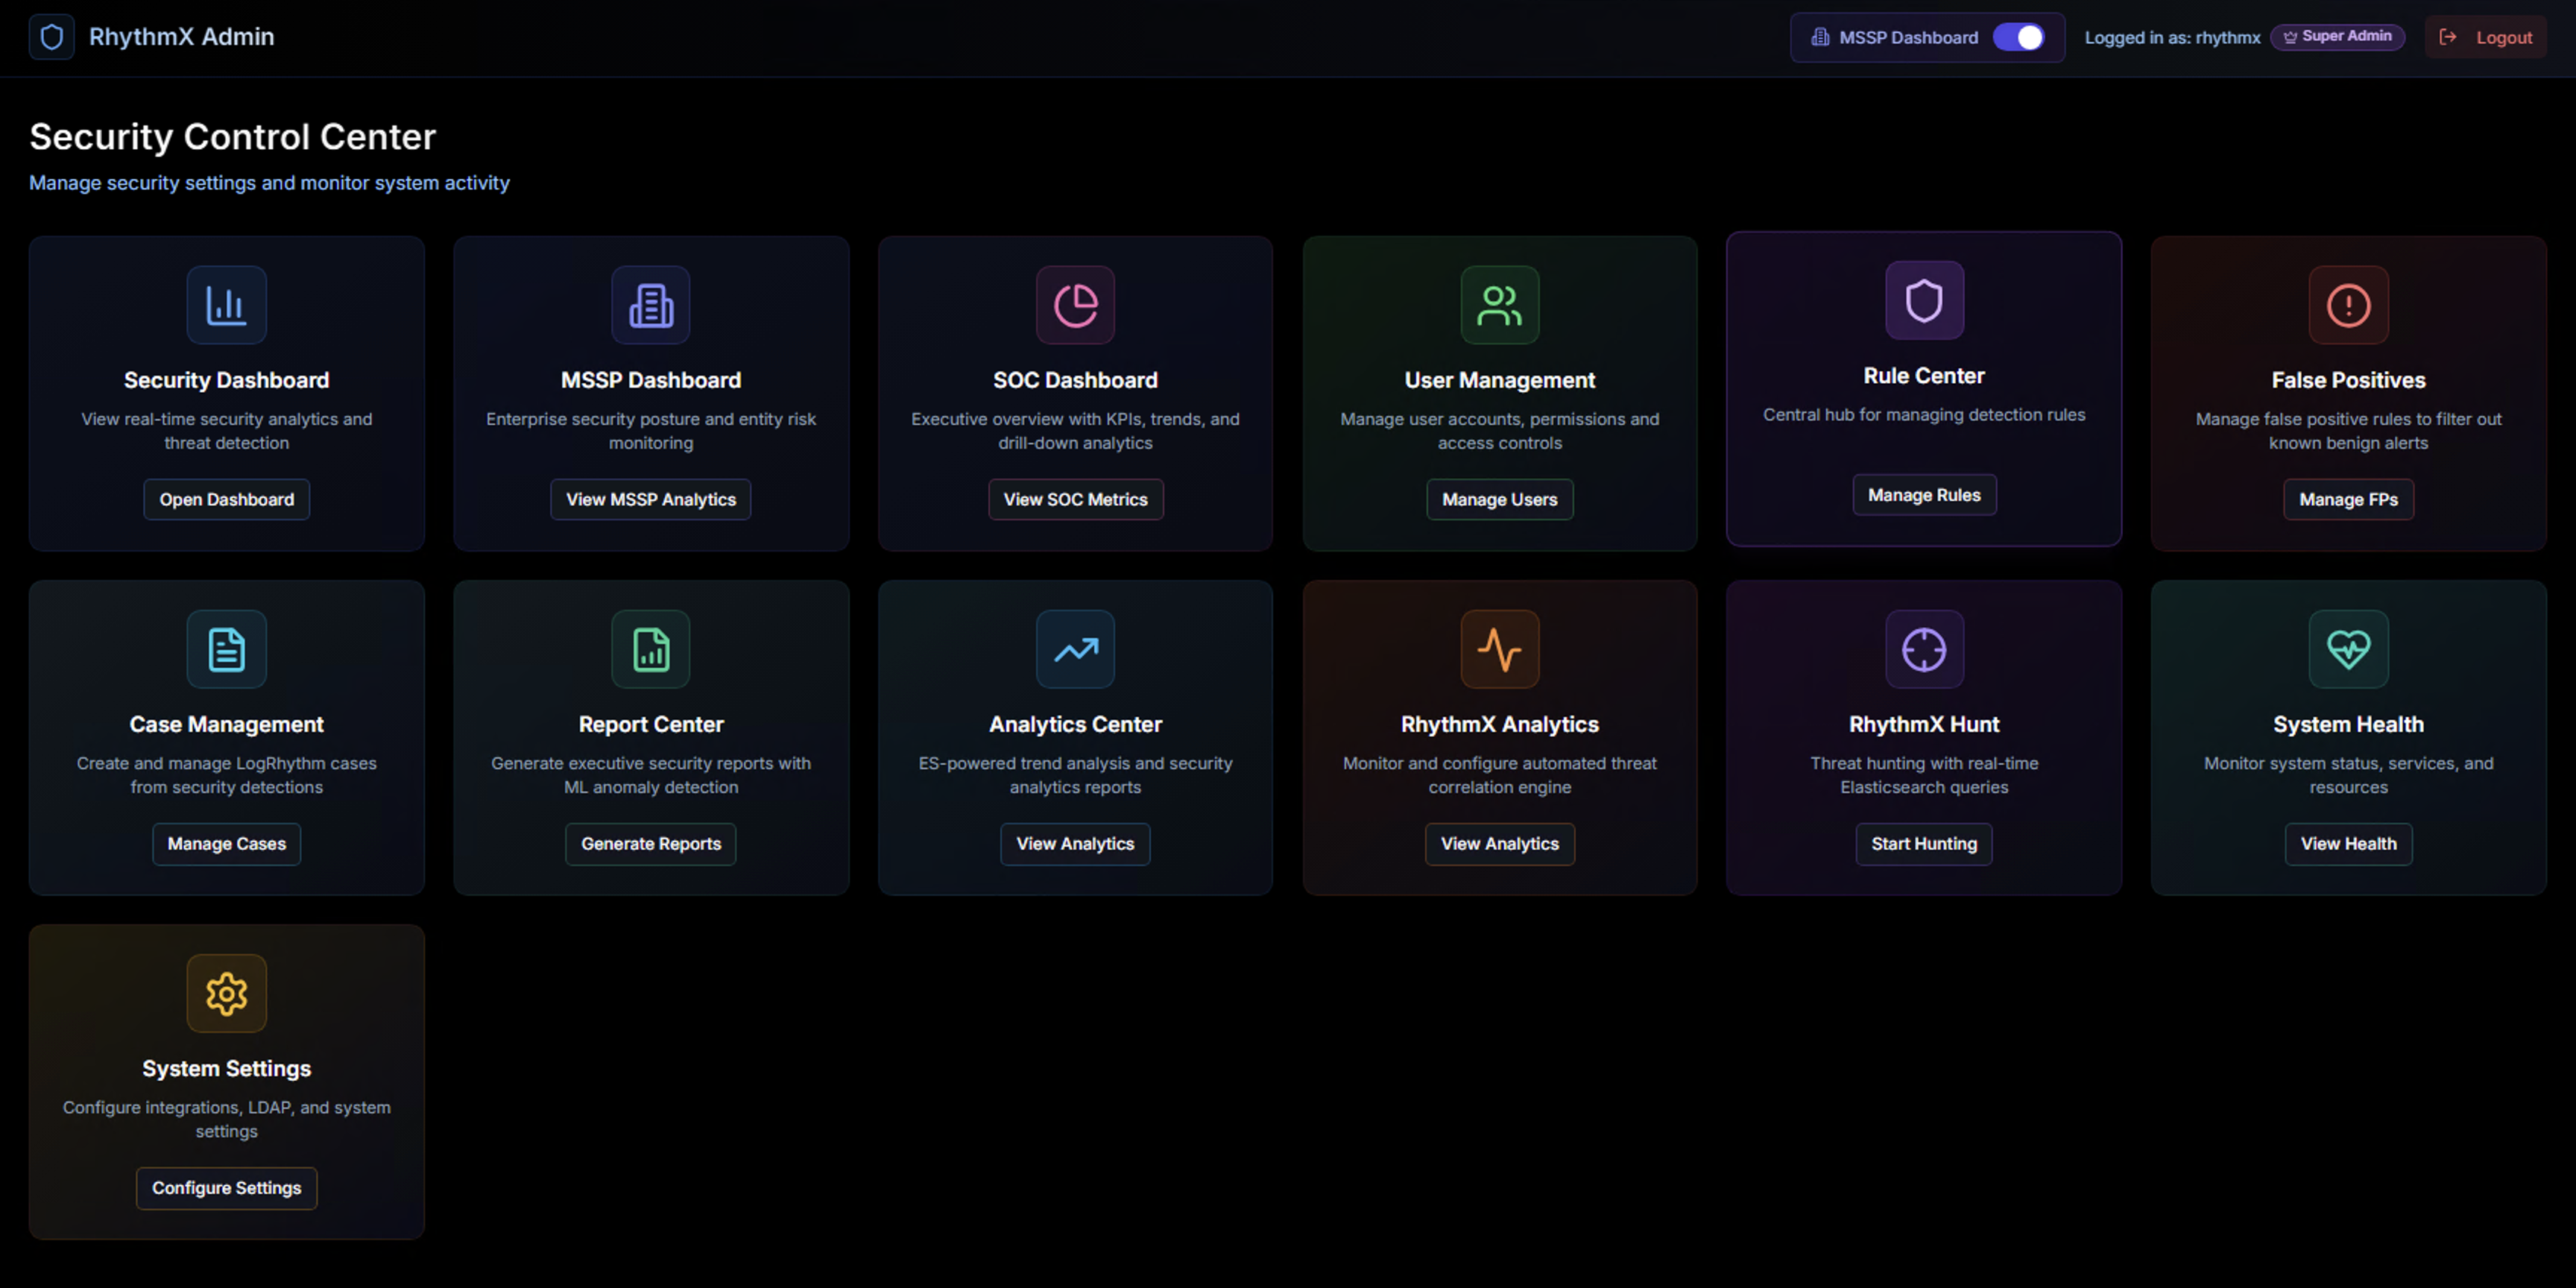
The Security Control Center displays all available modules. Locate the False Positives widget in the top row.
Click Manage FPs to open the False Positives Management page.
From the Investigation Workflow
You can also mark individual alerts as false positives directly from the Alert Detail Panel during an investigation — see Marking an Alert as False Positive below.
False Positives Management Console
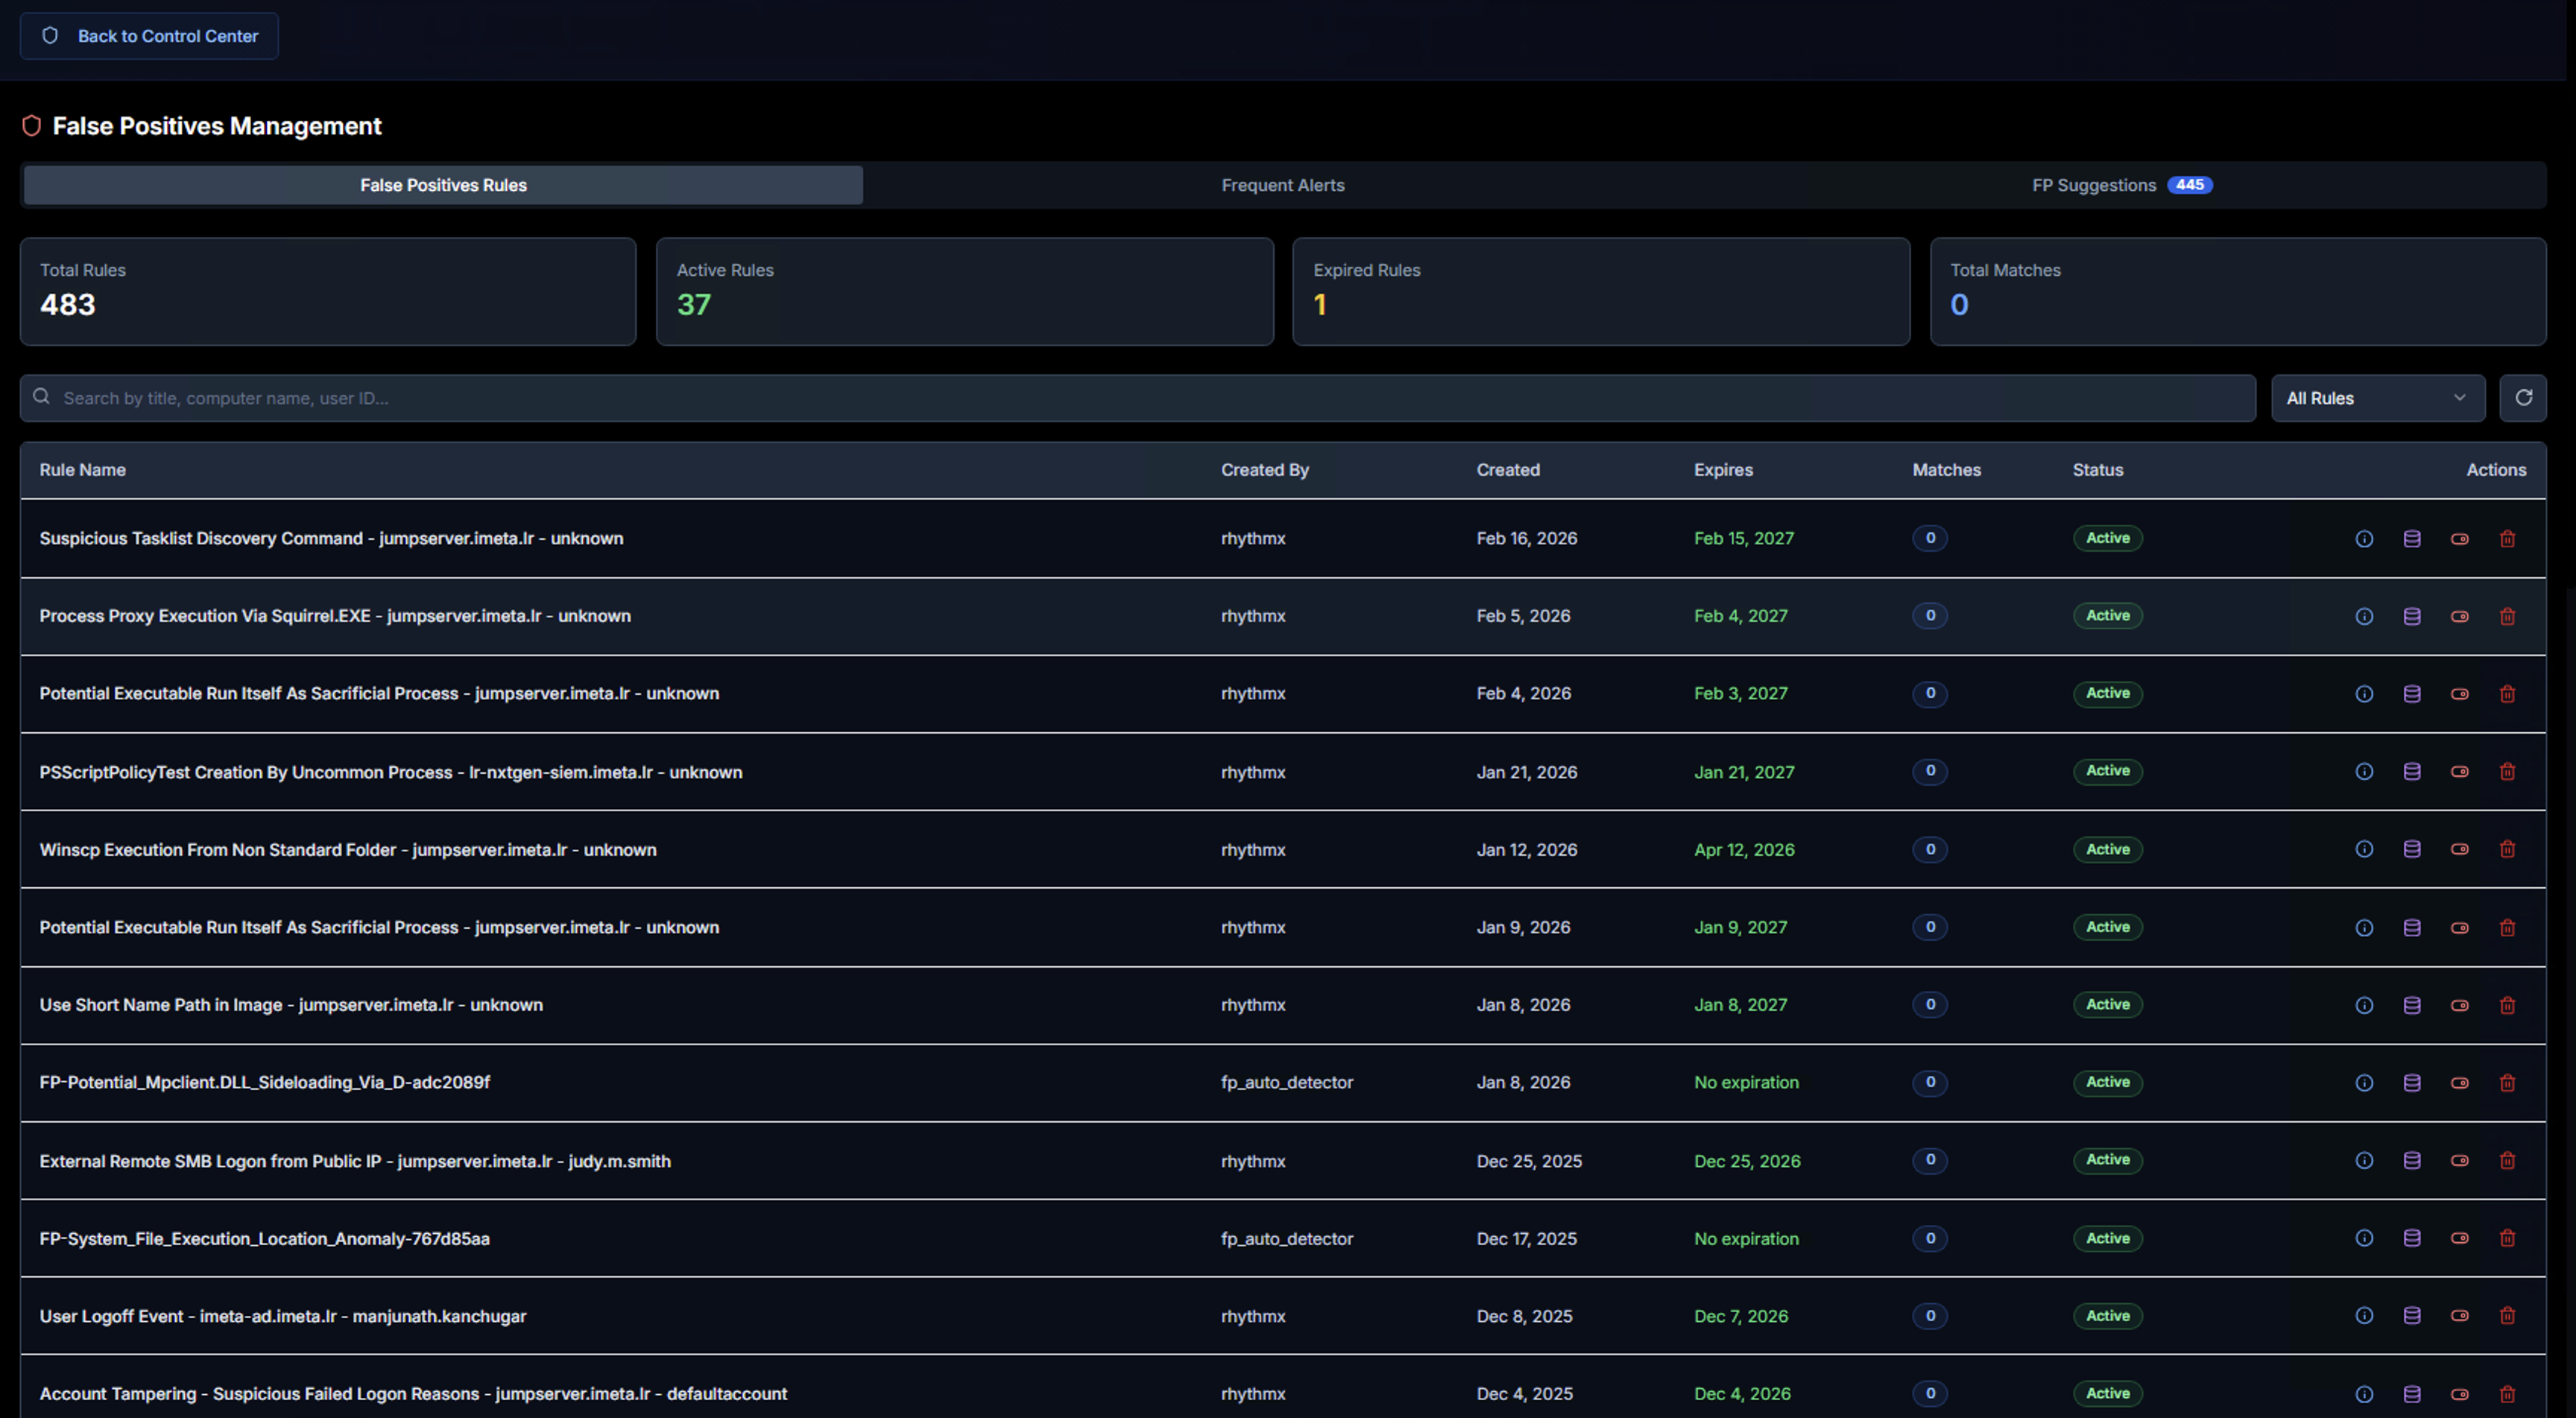
The False Positives Management page has three tabs:
| Tab | Purpose |
|---|---|
| False Positive Rules | View and manage all existing false positive rules |
| Frequent Alerts | Review the most frequently firing alerts for bulk false positive triage |
| FP Suggestions | AI-generated false positive recommendations based on pattern analysis |
False Positive Rules Tab
The default view shows all false positive rules with summary KPIs at the top:
| KPI | Description |
|---|---|
| Total Rules | Total number of false positive rules created across all analysts |
| Active Rules | Rules currently suppressing alerts |
| Expired Rules | Rules that have passed their expiration date and are no longer active |
| Total Matches | Number of alerts that have been suppressed by active rules |
Below the KPIs, a search bar allows filtering rules by title, computer name, user, or ID. The rule table shows:
| Column | Description |
|---|---|
| Rule Name | Descriptive name of the false positive rule |
| Created By | The analyst who created the rule |
| Created | Date the rule was created |
| Expires | Expiration date — rules with "No expiration" remain active indefinitely |
| Matches | Number of alerts suppressed by this rule |
| Status | Active or Expired |
| Actions | View details, edit, or delete the rule |
Viewing Rule Details
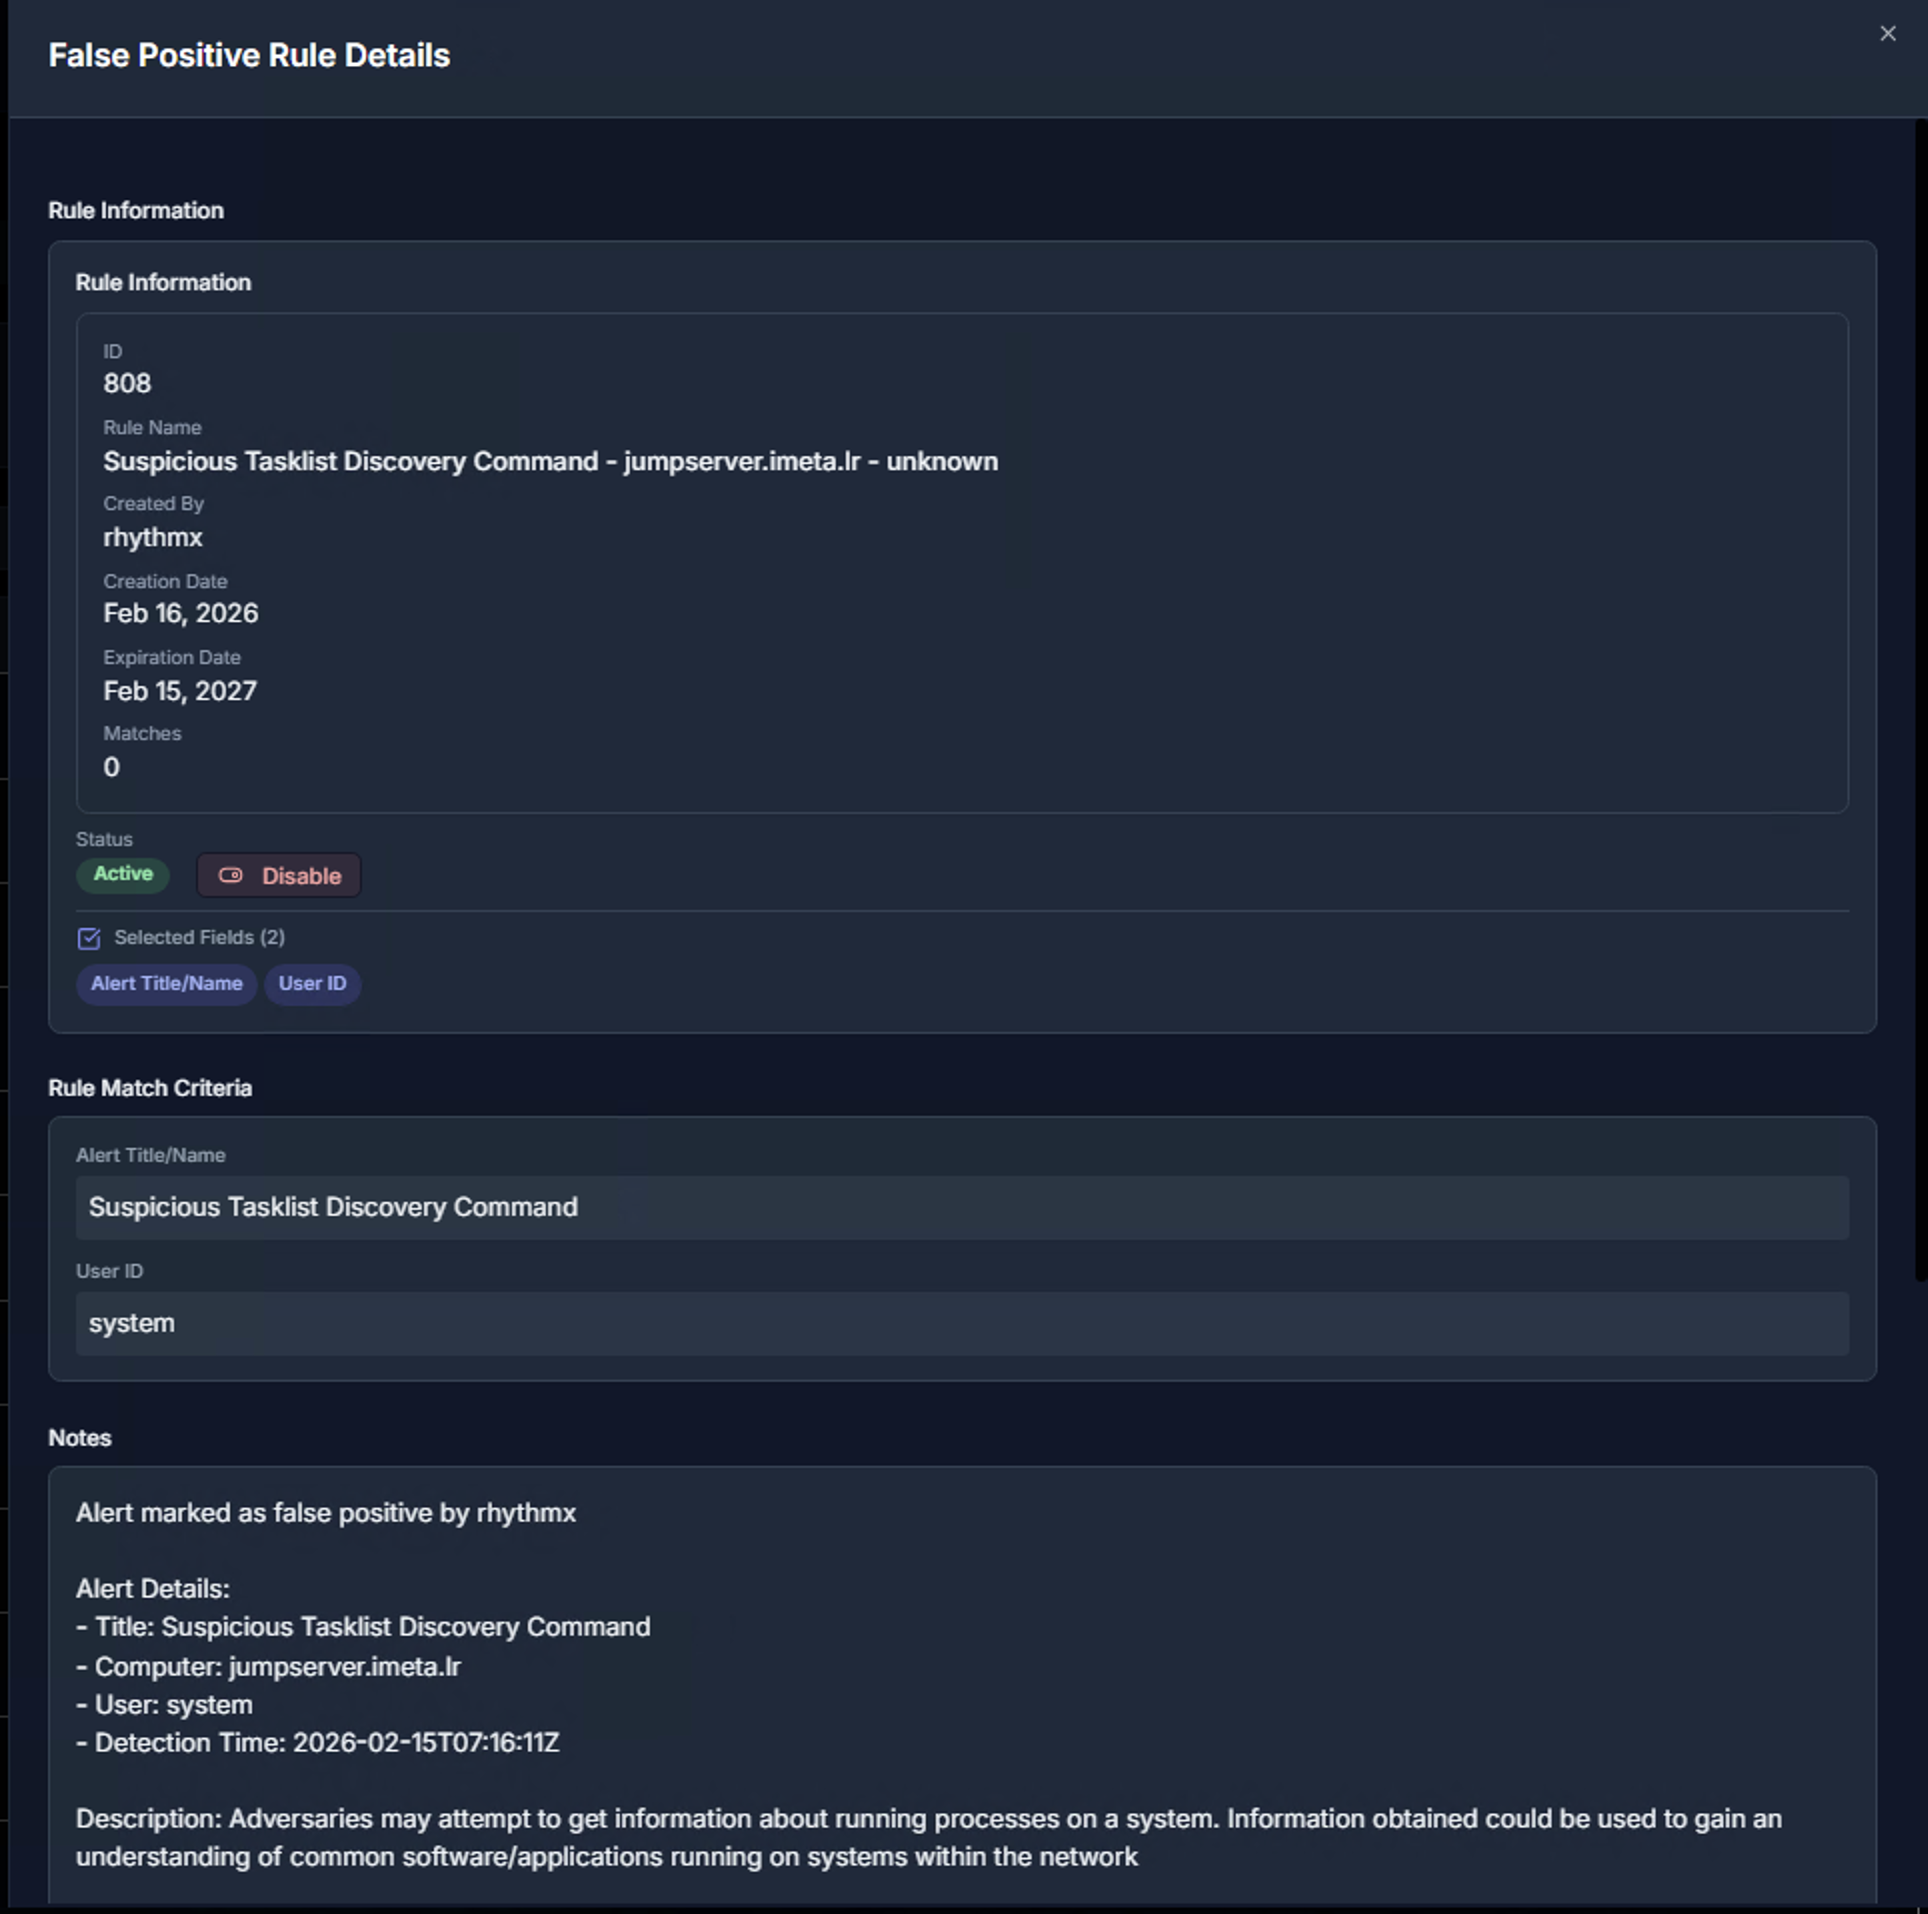
Click on any rule to open the False Positive Rule Details panel. The top section shows:
| Section | What It Contains |
|---|---|
| Rule Information | Rule ID, name, creator, creation date, expiration date, and match count |
| Status | Toggle between Active and Disable to enable or disable the rule without deleting it |
| Selected Fields | The metadata fields used for matching (e.g., Alert Title/Name, User ID) |
| Rule Match Criteria | The exact values being matched — for example, Alert Title = "Suspicious Tasklist Discovery Command" and User ID = "system" |
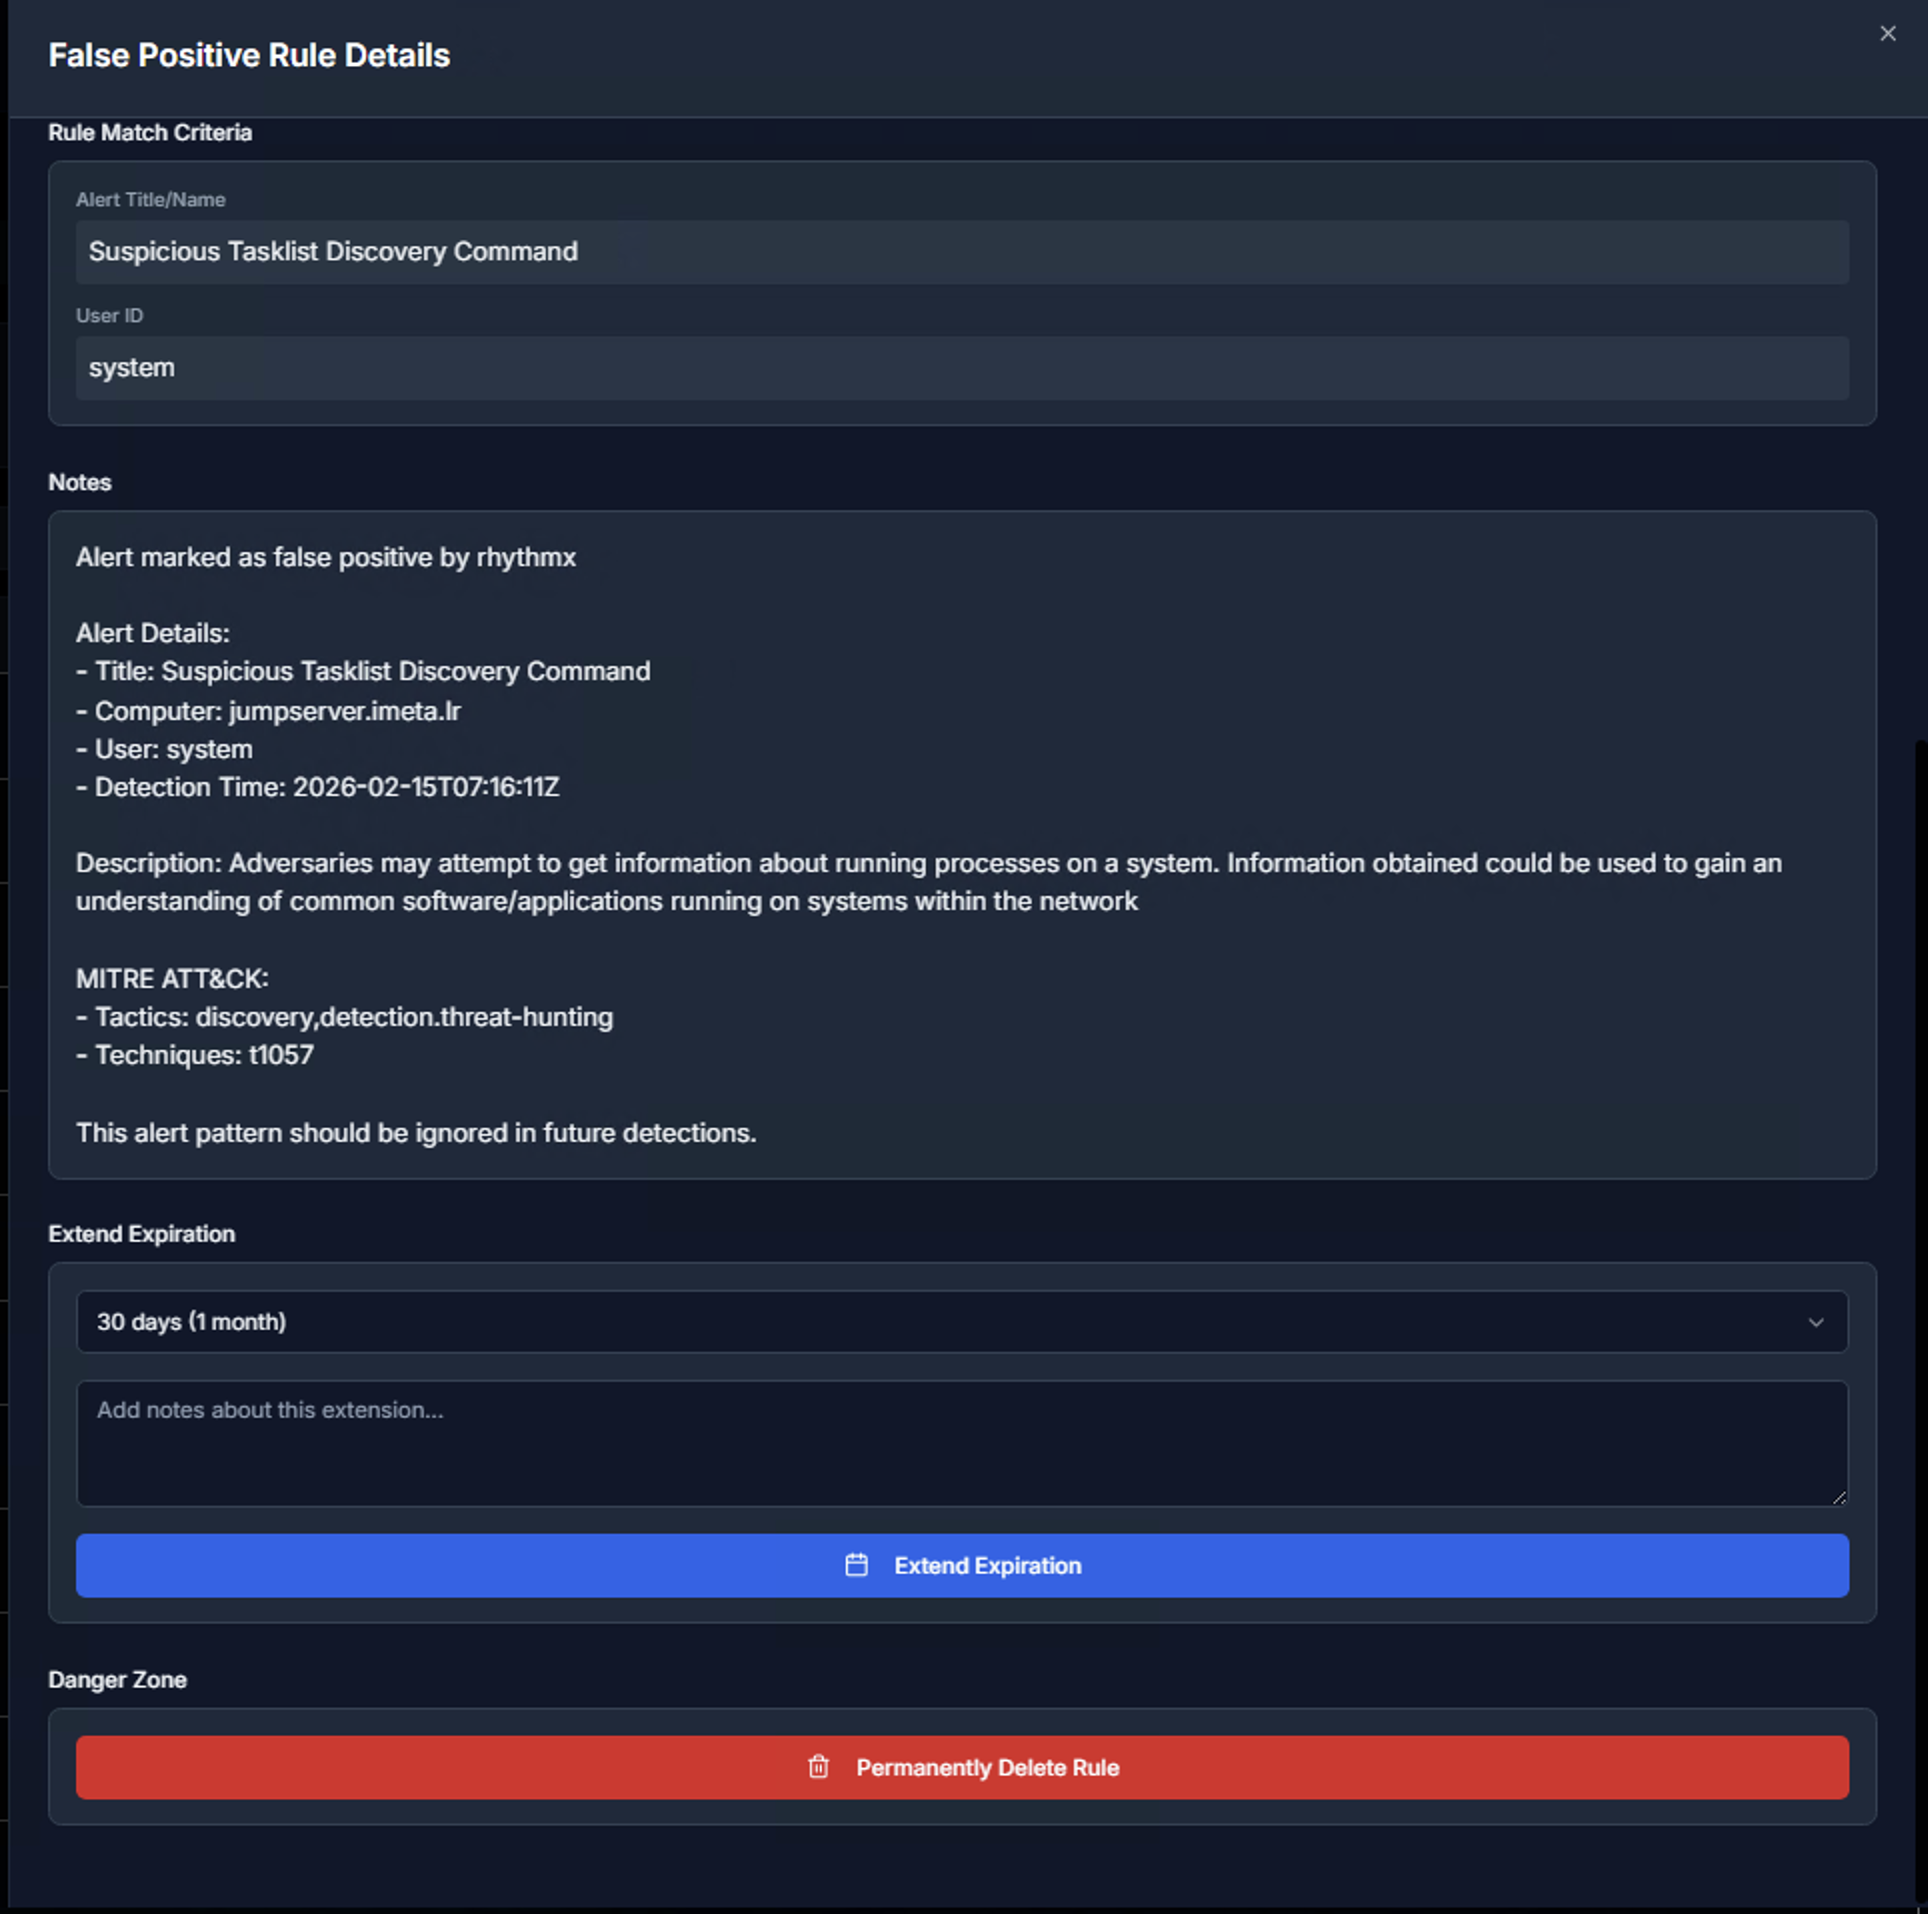
Scrolling down reveals:
| Section | What It Contains |
|---|---|
| Notes | The analyst's justification for marking this as a false positive, including alert details, computer, user, detection time, description, and MITRE ATT&CK mapping |
| Extend Expiration | Extend the rule's expiration period (e.g., 30 days / 1 month) with optional notes explaining the extension |
| Danger Zone | Permanently Delete Rule — removes the rule entirely from the database. This action cannot be undone |
Deleting Matching Alerts
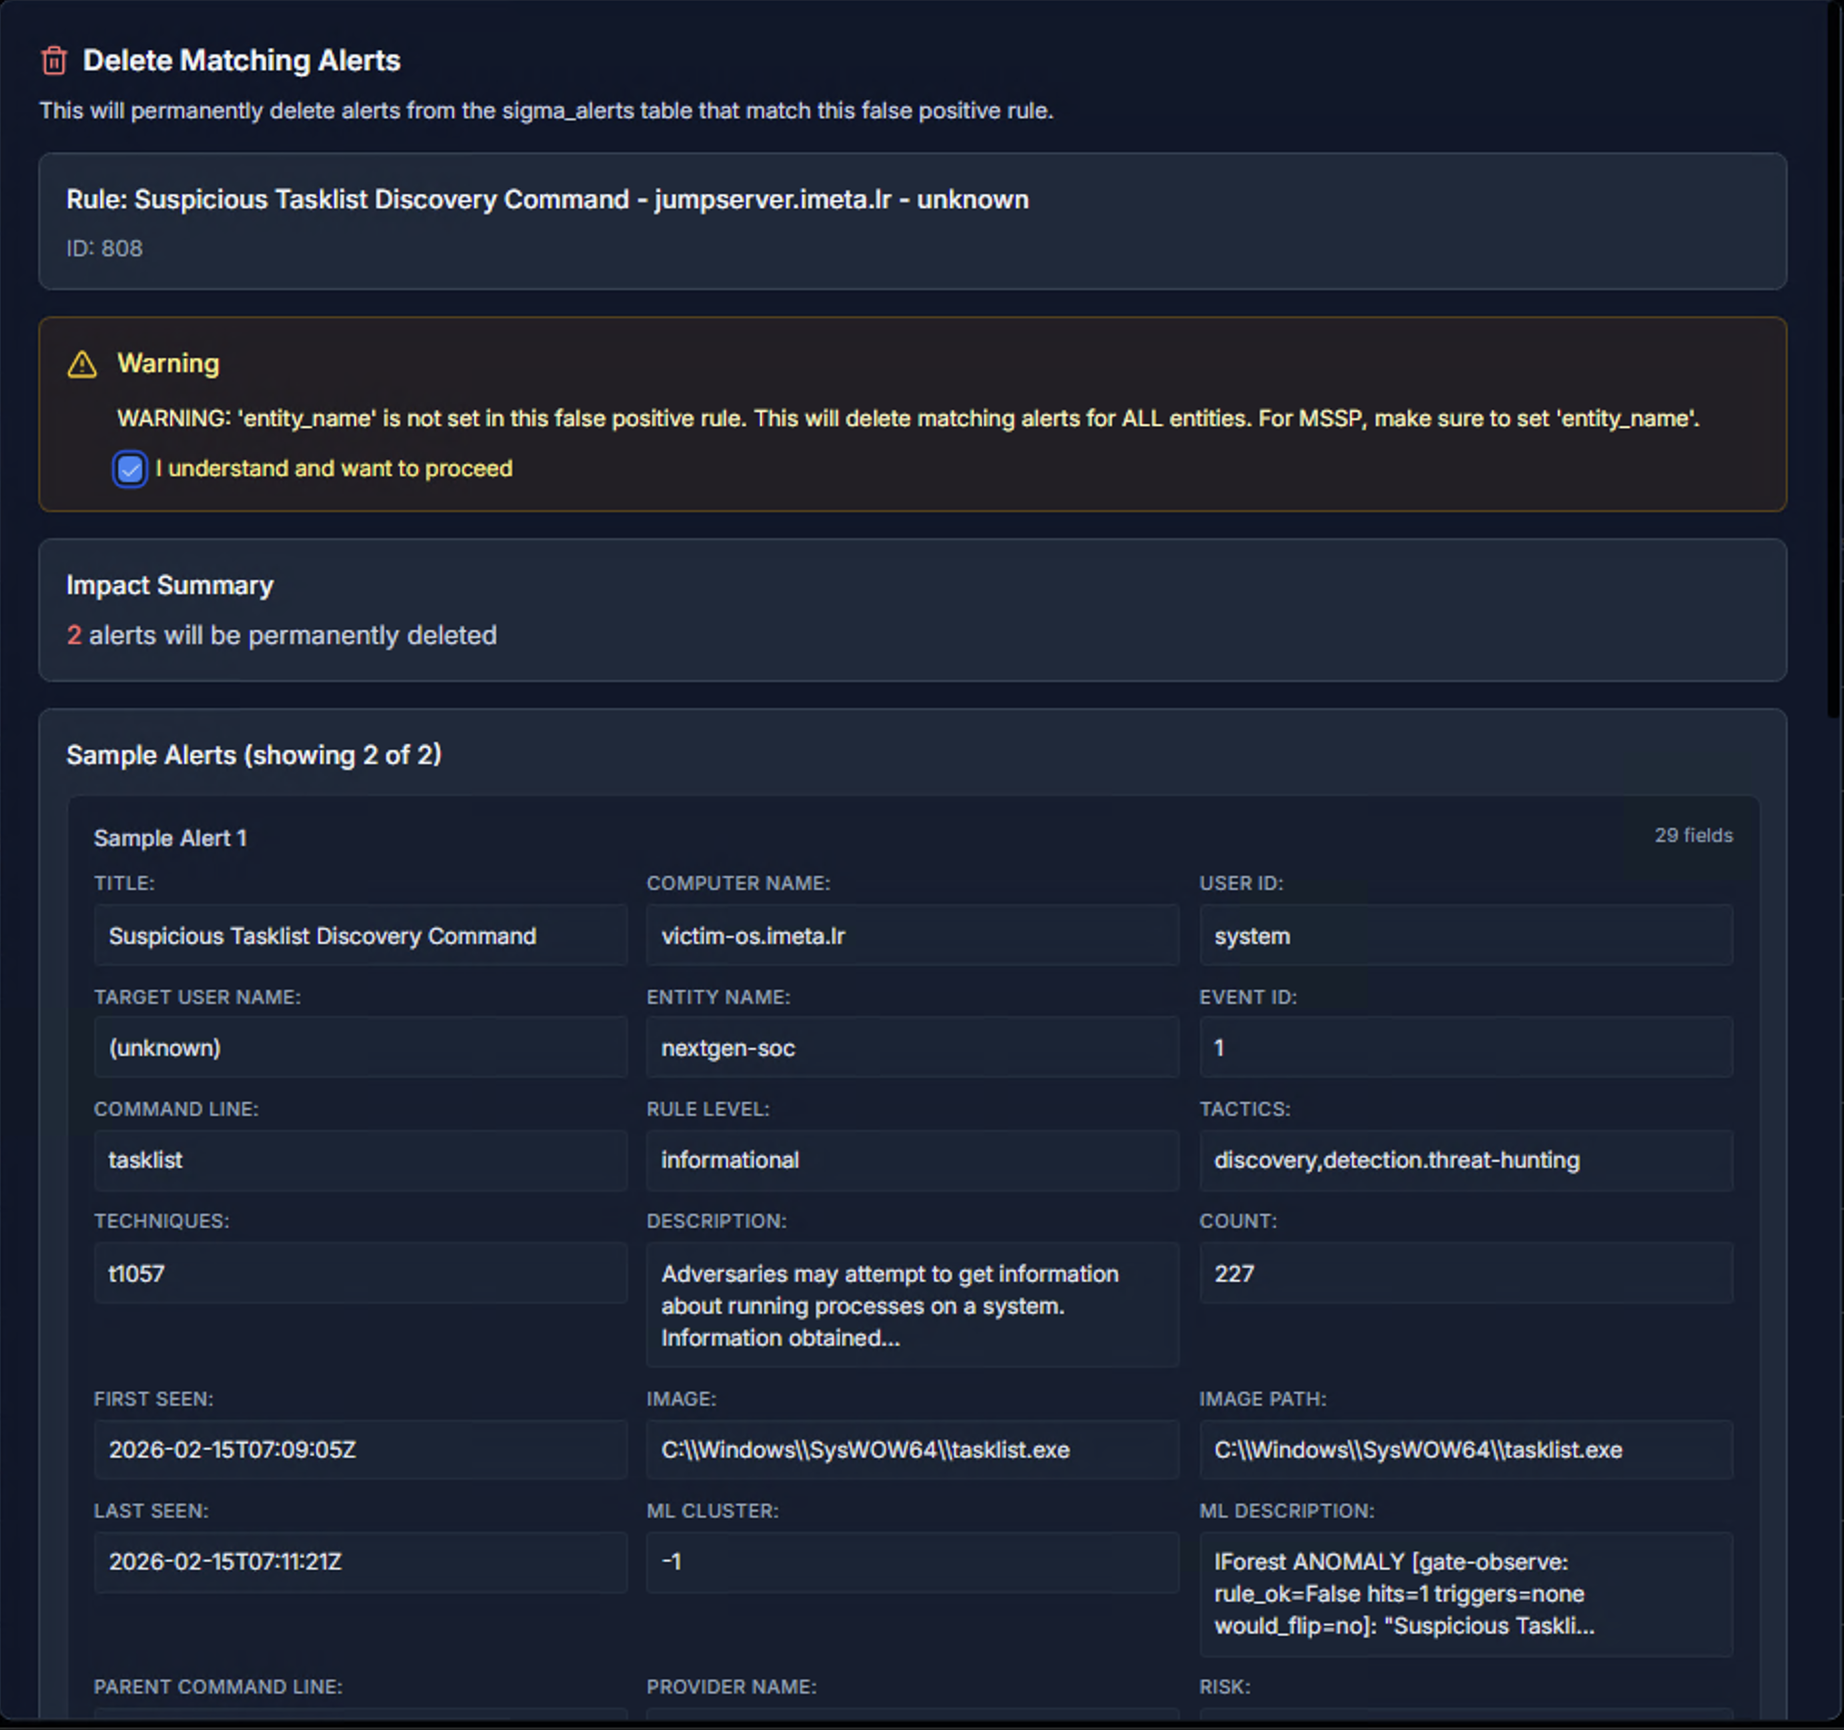
When cleaning up alerts that match a false positive rule, RhythmX shows a Delete Matching Alerts view with:
- Rule reference — Which false positive rule is being applied
- Warning — Important notices about the scope of deletion (e.g., if entity_name is not set, deletion applies to ALL entities)
- Impact Summary — Exactly how many alerts will be permanently deleted
- Sample Alerts — A preview of the matching alerts with full details so you can verify before deleting
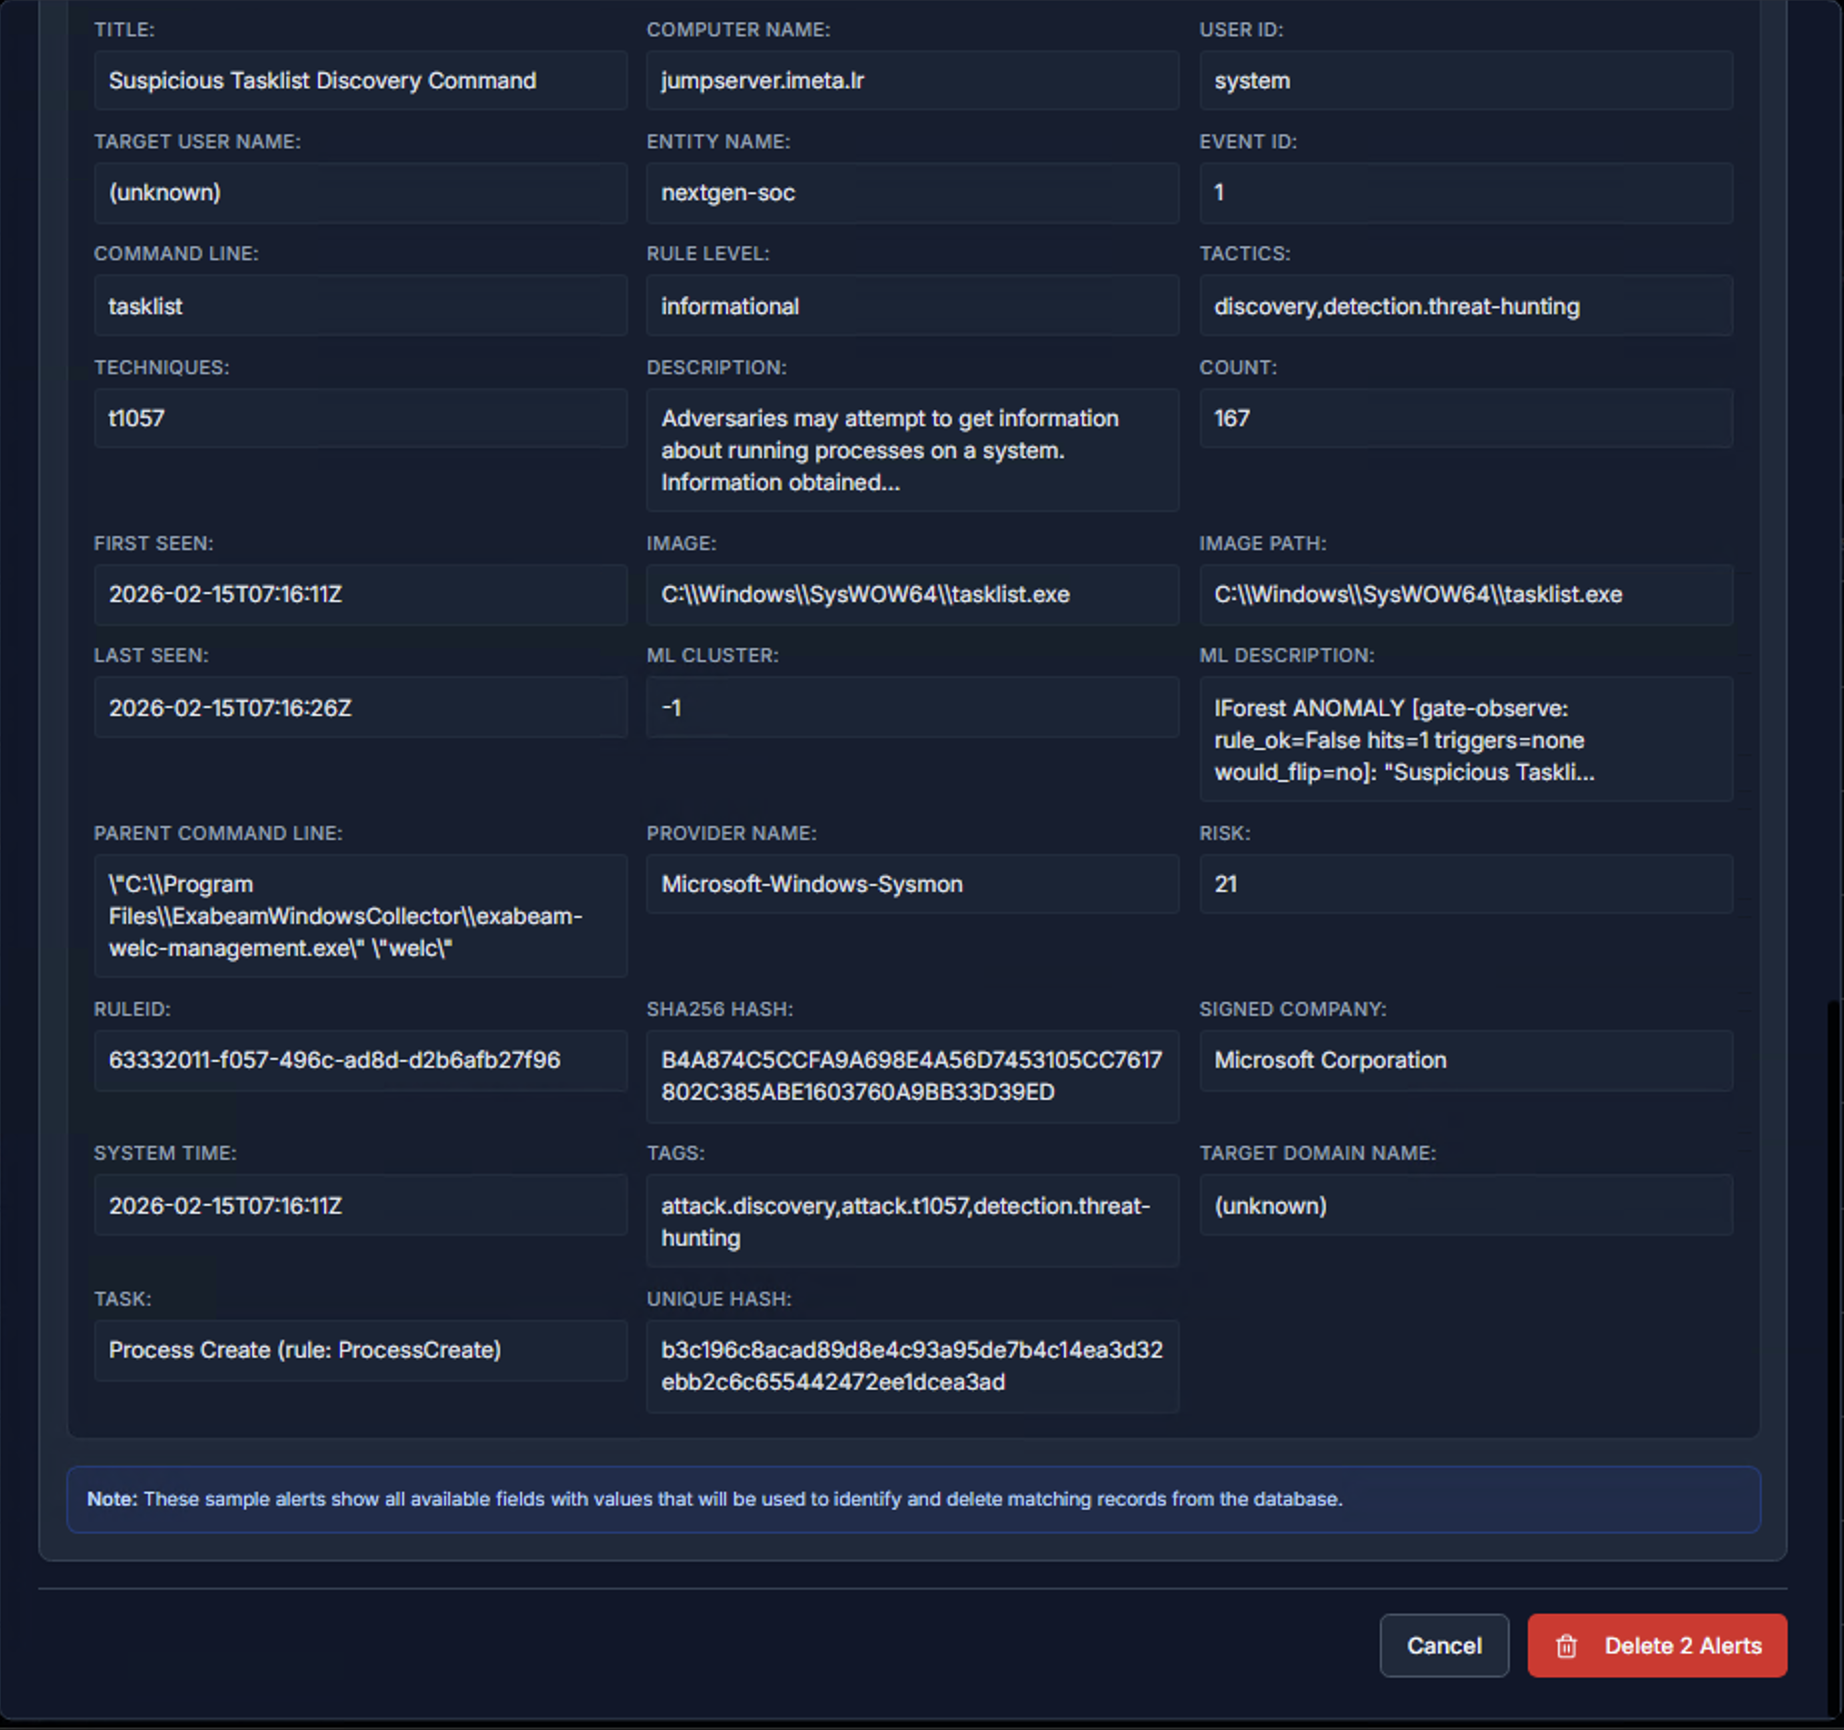
Each sample alert shows every available field — Title, Computer Name, User ID, Target User Name, Entity Name, Command Line, Rule Level, Tactics, Techniques, Description, Count, First Seen, Last Seen, Image Path, ML Description, Parent Command Line, Provider Name, and Risk score.
Review the sample alerts carefully, then click Delete Alerts to proceed or Cancel to abort.
Permanently Deleting a Rule
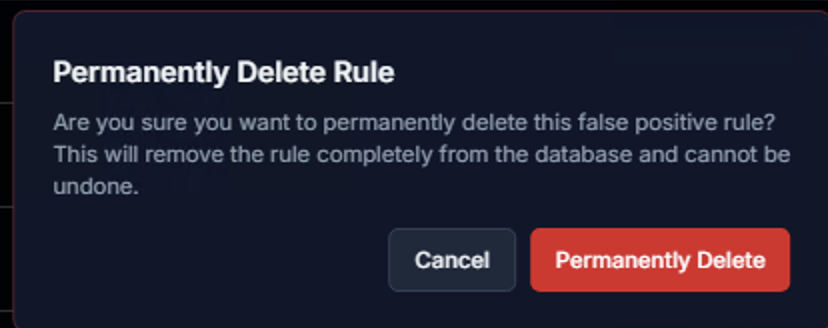
Clicking Permanently Delete Rule in the Danger Zone triggers a confirmation dialog. This action:
- Removes the false positive rule completely from the database
- Cannot be undone — the rule must be recreated manually if needed
- Does not restore previously suppressed alerts
Click Permanently Delete to confirm, or Cancel to keep the rule.
Frequent Alerts
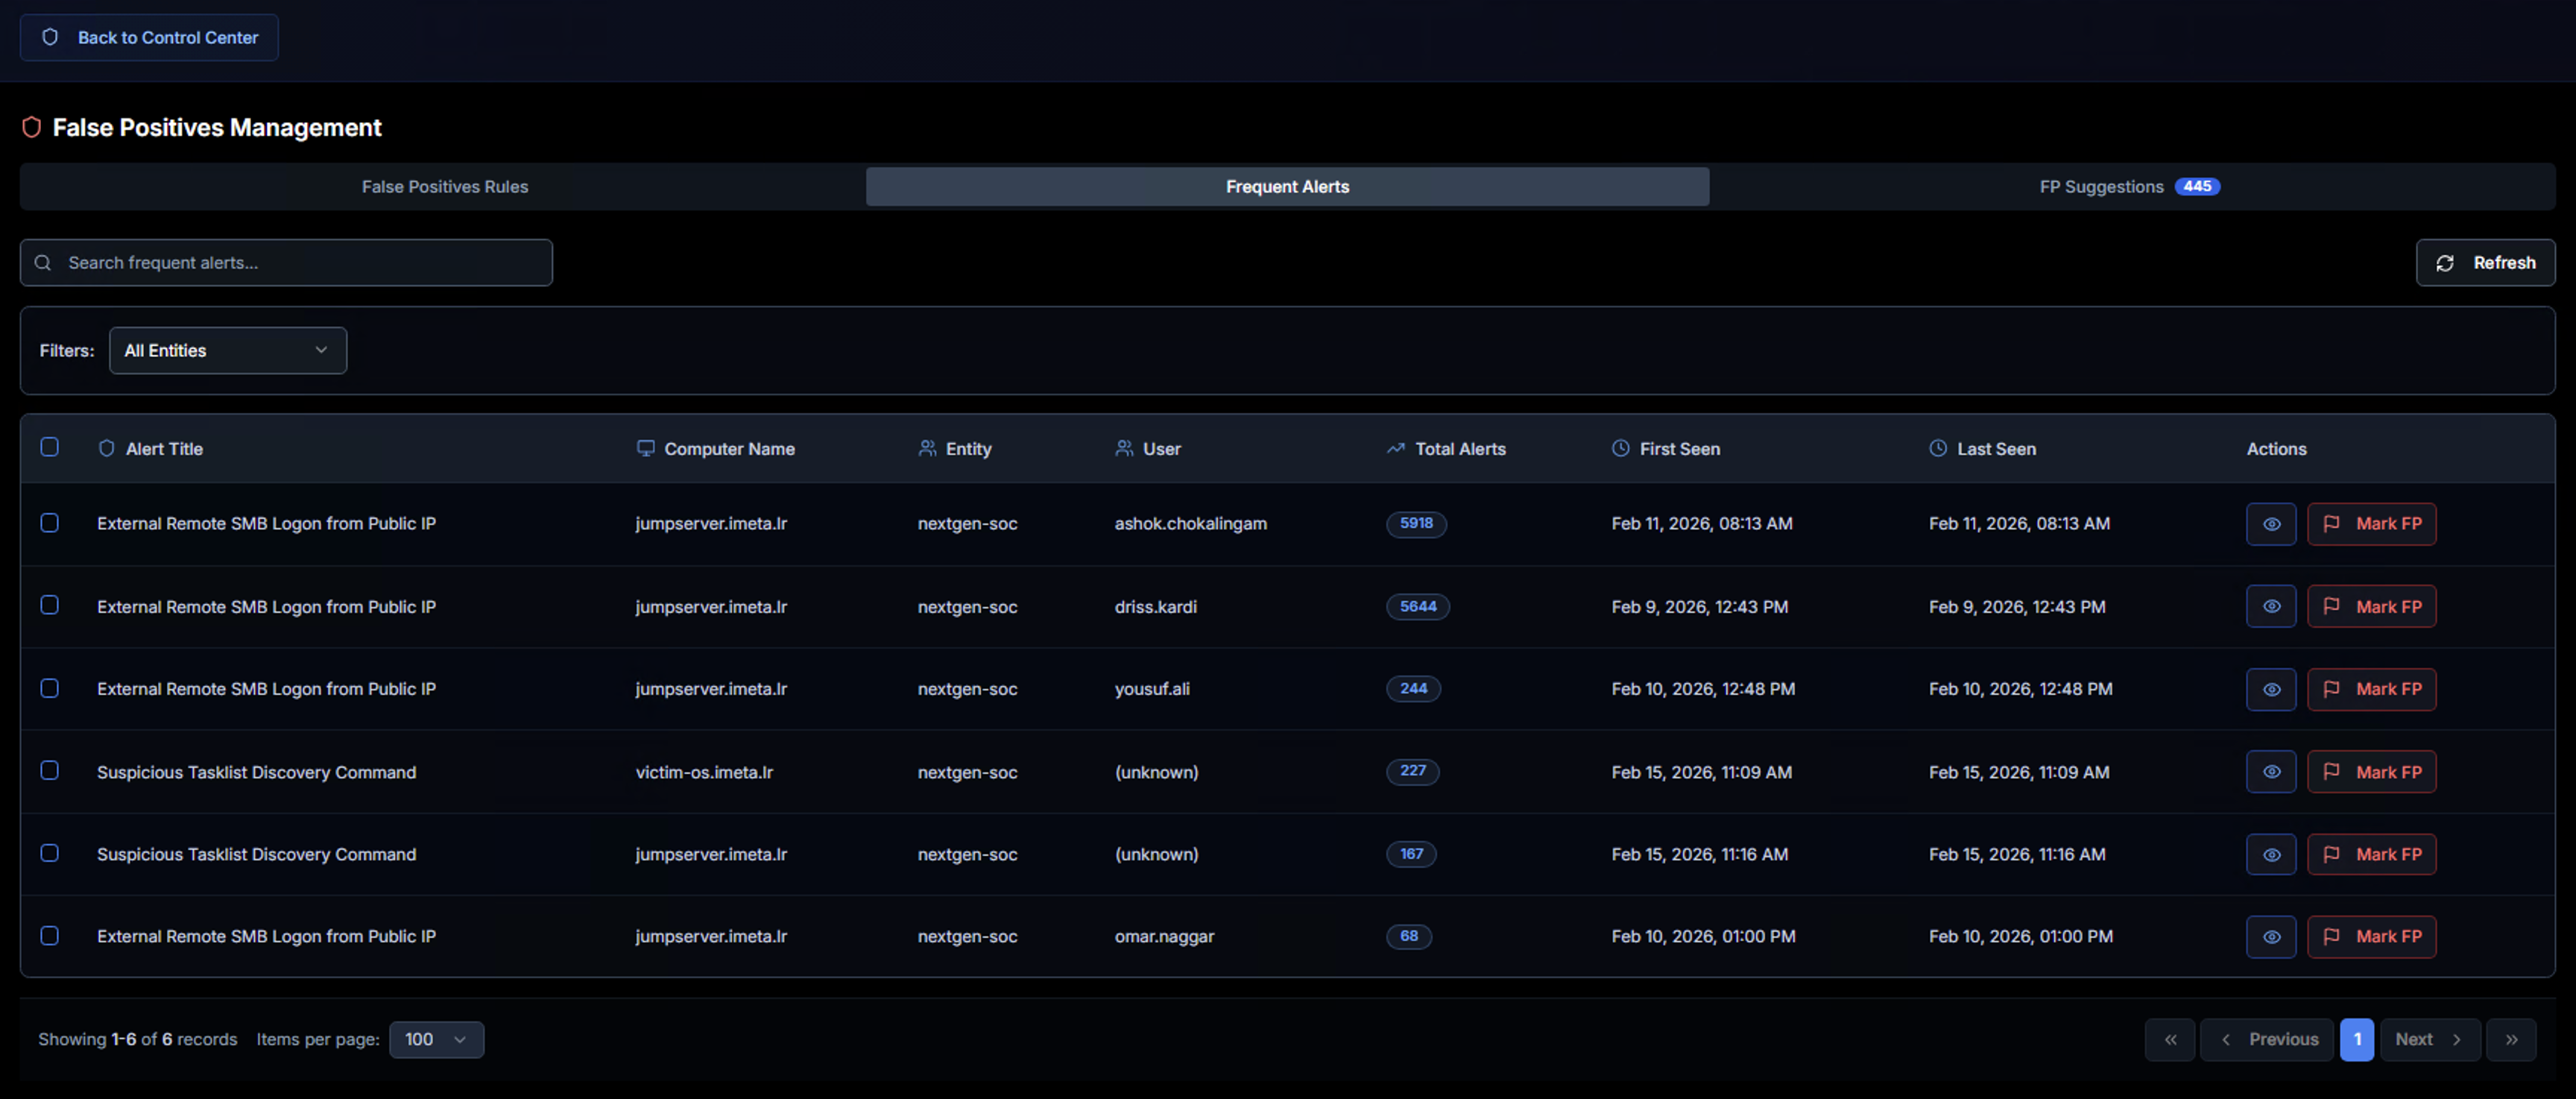
The Frequent Alerts tab surfaces alerts that are firing most often across the environment. These are prime candidates for false positive review because high-frequency alerts are more likely to be benign, expected behavior.
The table shows:
| Column | Description |
|---|---|
| Alert Title | The Sigma rule name generating frequent alerts |
| Computer Name | The system where the alerts are firing |
| Entity | The LogRhythm entity associated with the alerts |
| User | The user account triggering the alerts |
| Total Alerts | How many times this alert has fired — higher counts indicate noisier rules |
| First Seen | When this alert pattern first appeared |
| Last Seen | Most recent occurrence |
| Actions | View details or click Mark FP to create a false positive rule directly |
Use the search bar to filter by alert title and the Filters dropdown to scope by entity. The Refresh button updates the list with the latest data.
Clicking Mark FP on any row opens the same Mark as False Positive dialog described below, pre-populated with the alert's details.
FP Suggestions (AI-Powered)
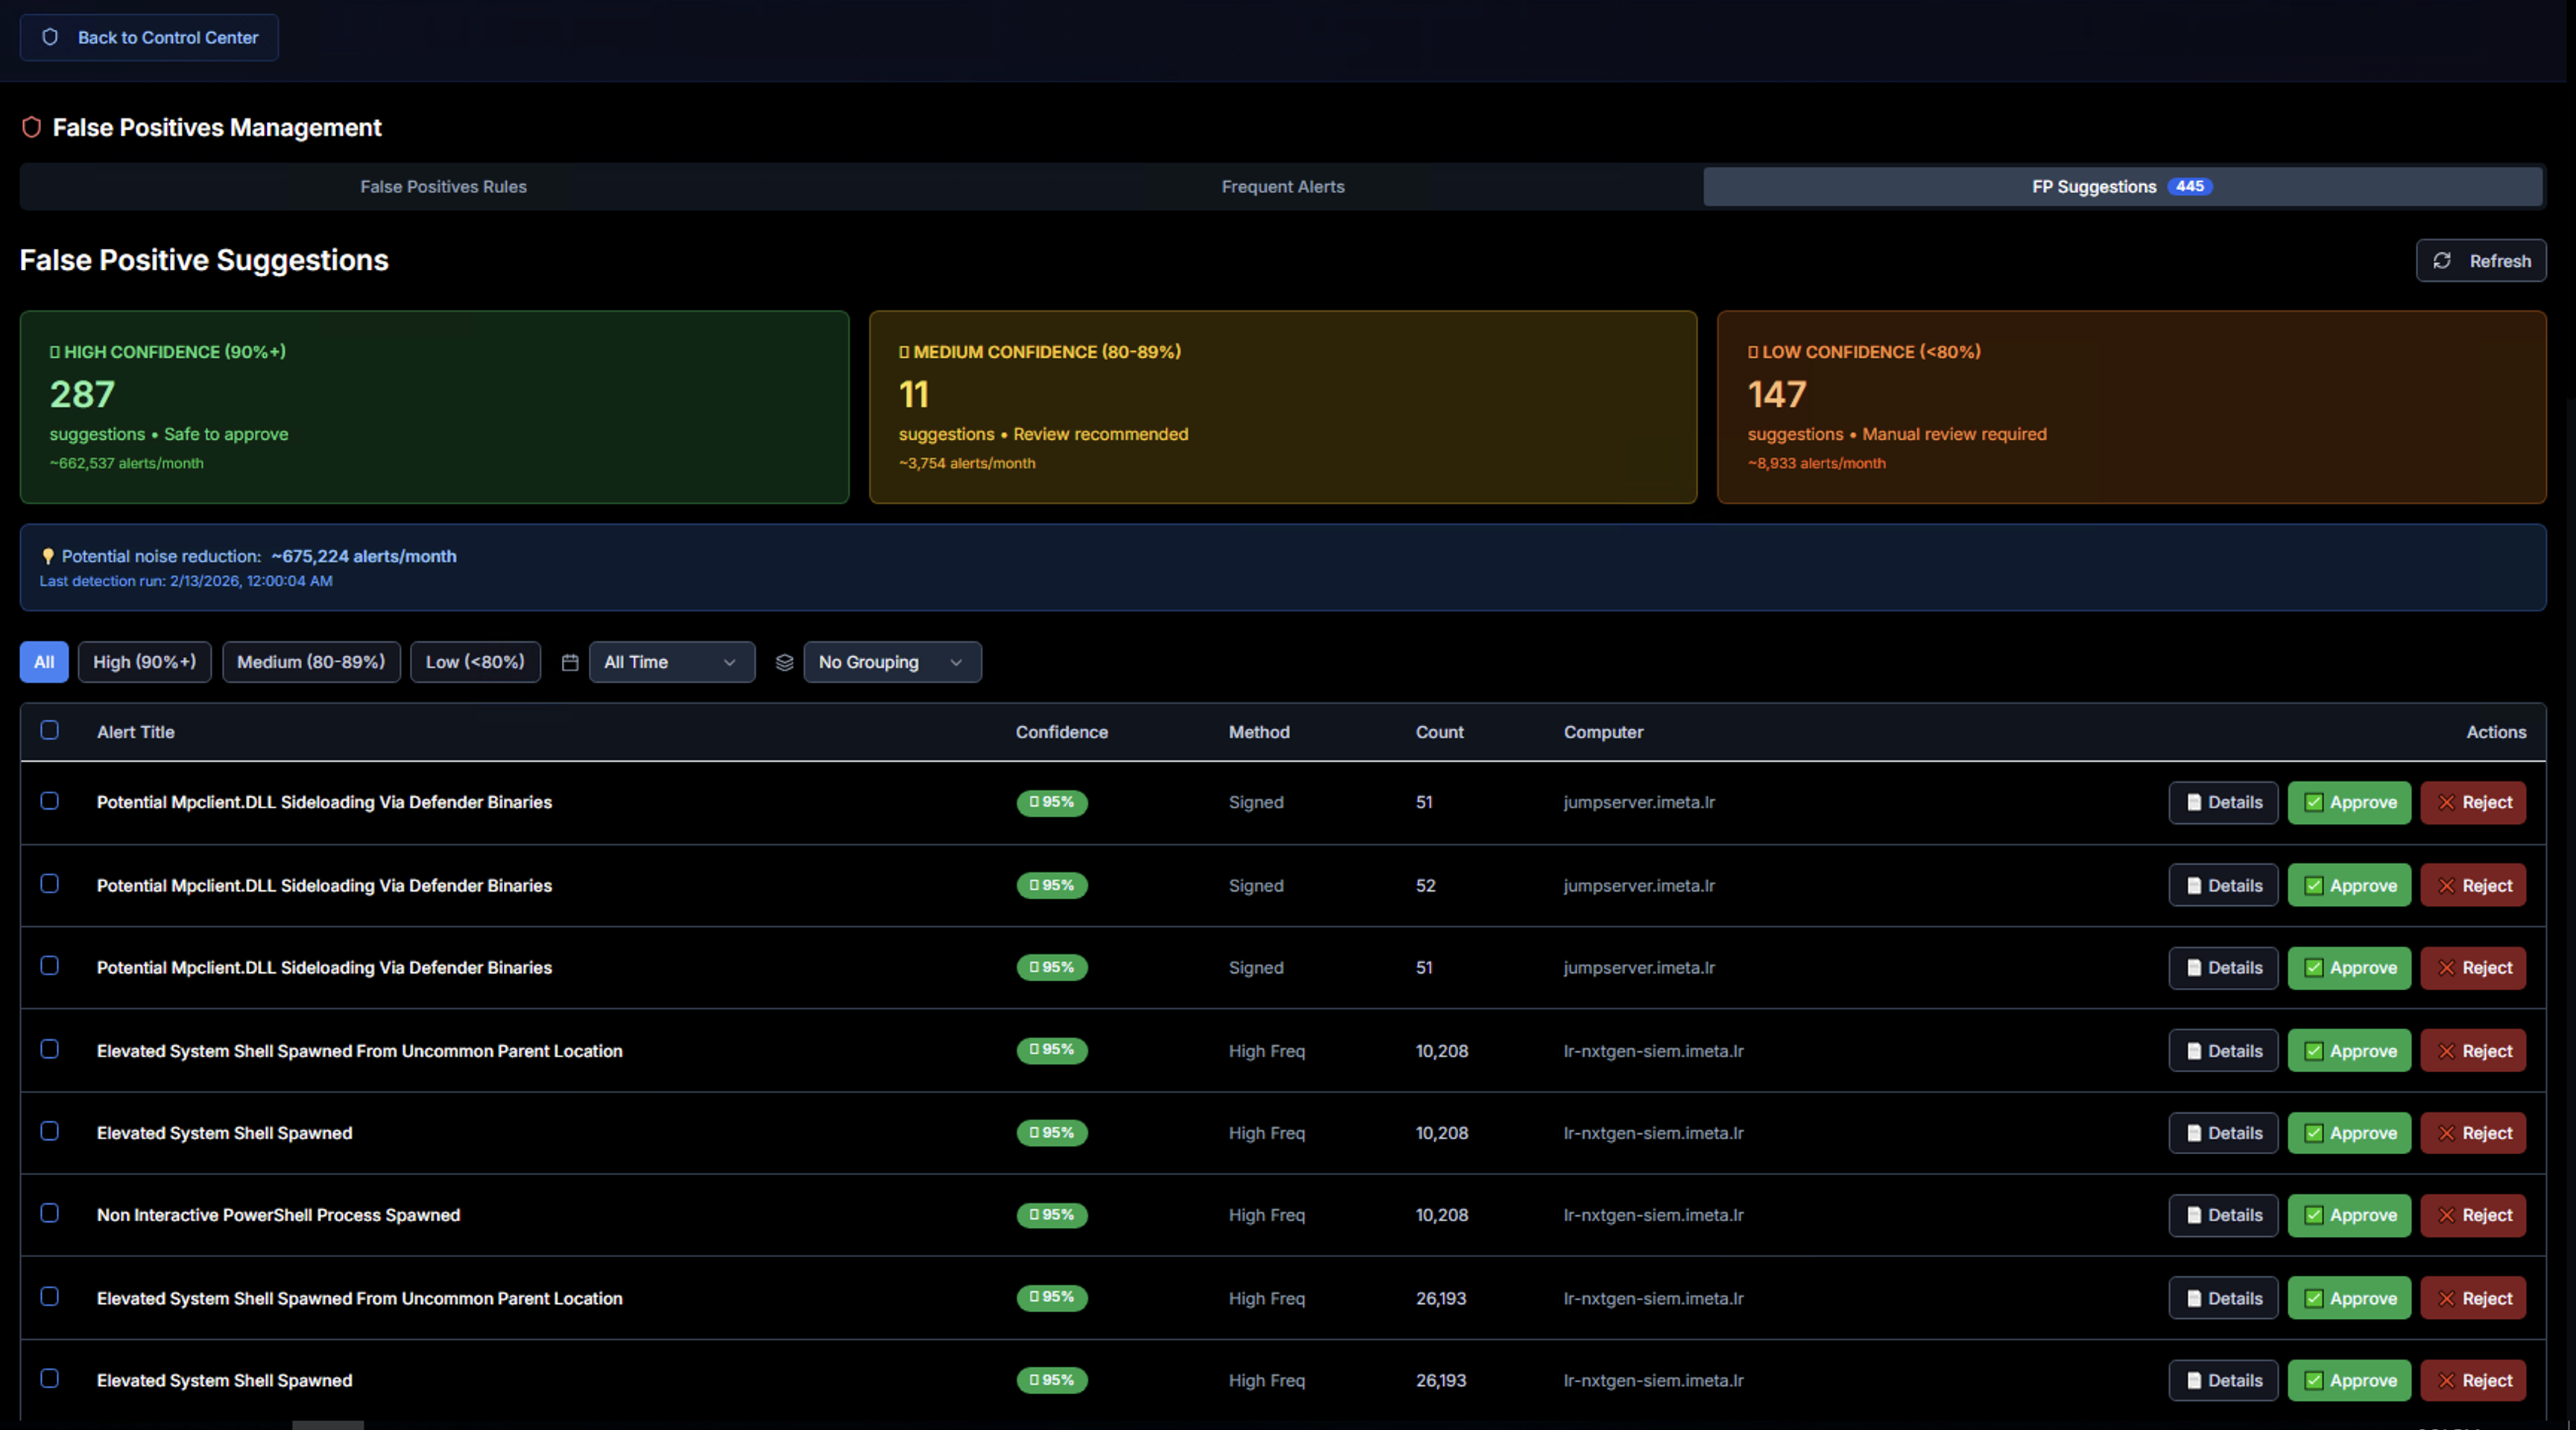
The FP Suggestions tab uses AI to automatically identify alerts that are likely false positives based on pattern analysis, frequency, and contextual signals. This dramatically reduces the manual effort required to tune detection rules.
Confidence Tiers
Suggestions are grouped into three confidence levels:
| Tier | Confidence | Meaning | Recommended Action |
|---|---|---|---|
| High Confidence (90%+) | Green | Strong signals indicate this is a false positive — safe to approve | Approve directly |
| Medium Confidence (60–89%) | Yellow | Likely a false positive, but review is recommended before approving | Review details, then approve or reject |
| Low Confidence (<60%) | Red | Uncertain — manual review required before making a decision | Investigate thoroughly before deciding |
Each tier shows the number of suggestions and the estimated alerts/month that would be suppressed if approved.
A banner at the top shows the potential noise reduction — the total number of alerts per month that could be eliminated by approving all suggestions.
Suggestion Table
Each suggestion row shows:
| Column | Description |
|---|---|
| Alert Title | The Sigma rule being suggested for suppression |
| Confidence | Percentage-based confidence score with color coding |
| Method | How the suggestion was generated (e.g., Signed = digitally signed binary, High Freq = high frequency pattern) |
| Count | Number of matching alert occurrences |
| Computer | The system associated with this suggestion |
| Actions | Details to review, Approve to activate as a false positive rule, or Reject to dismiss |
Use the filter buttons (All, High, Medium, Low) to focus on a specific confidence tier, and the time range dropdown to adjust the analysis window.
Reviewing a Suggestion
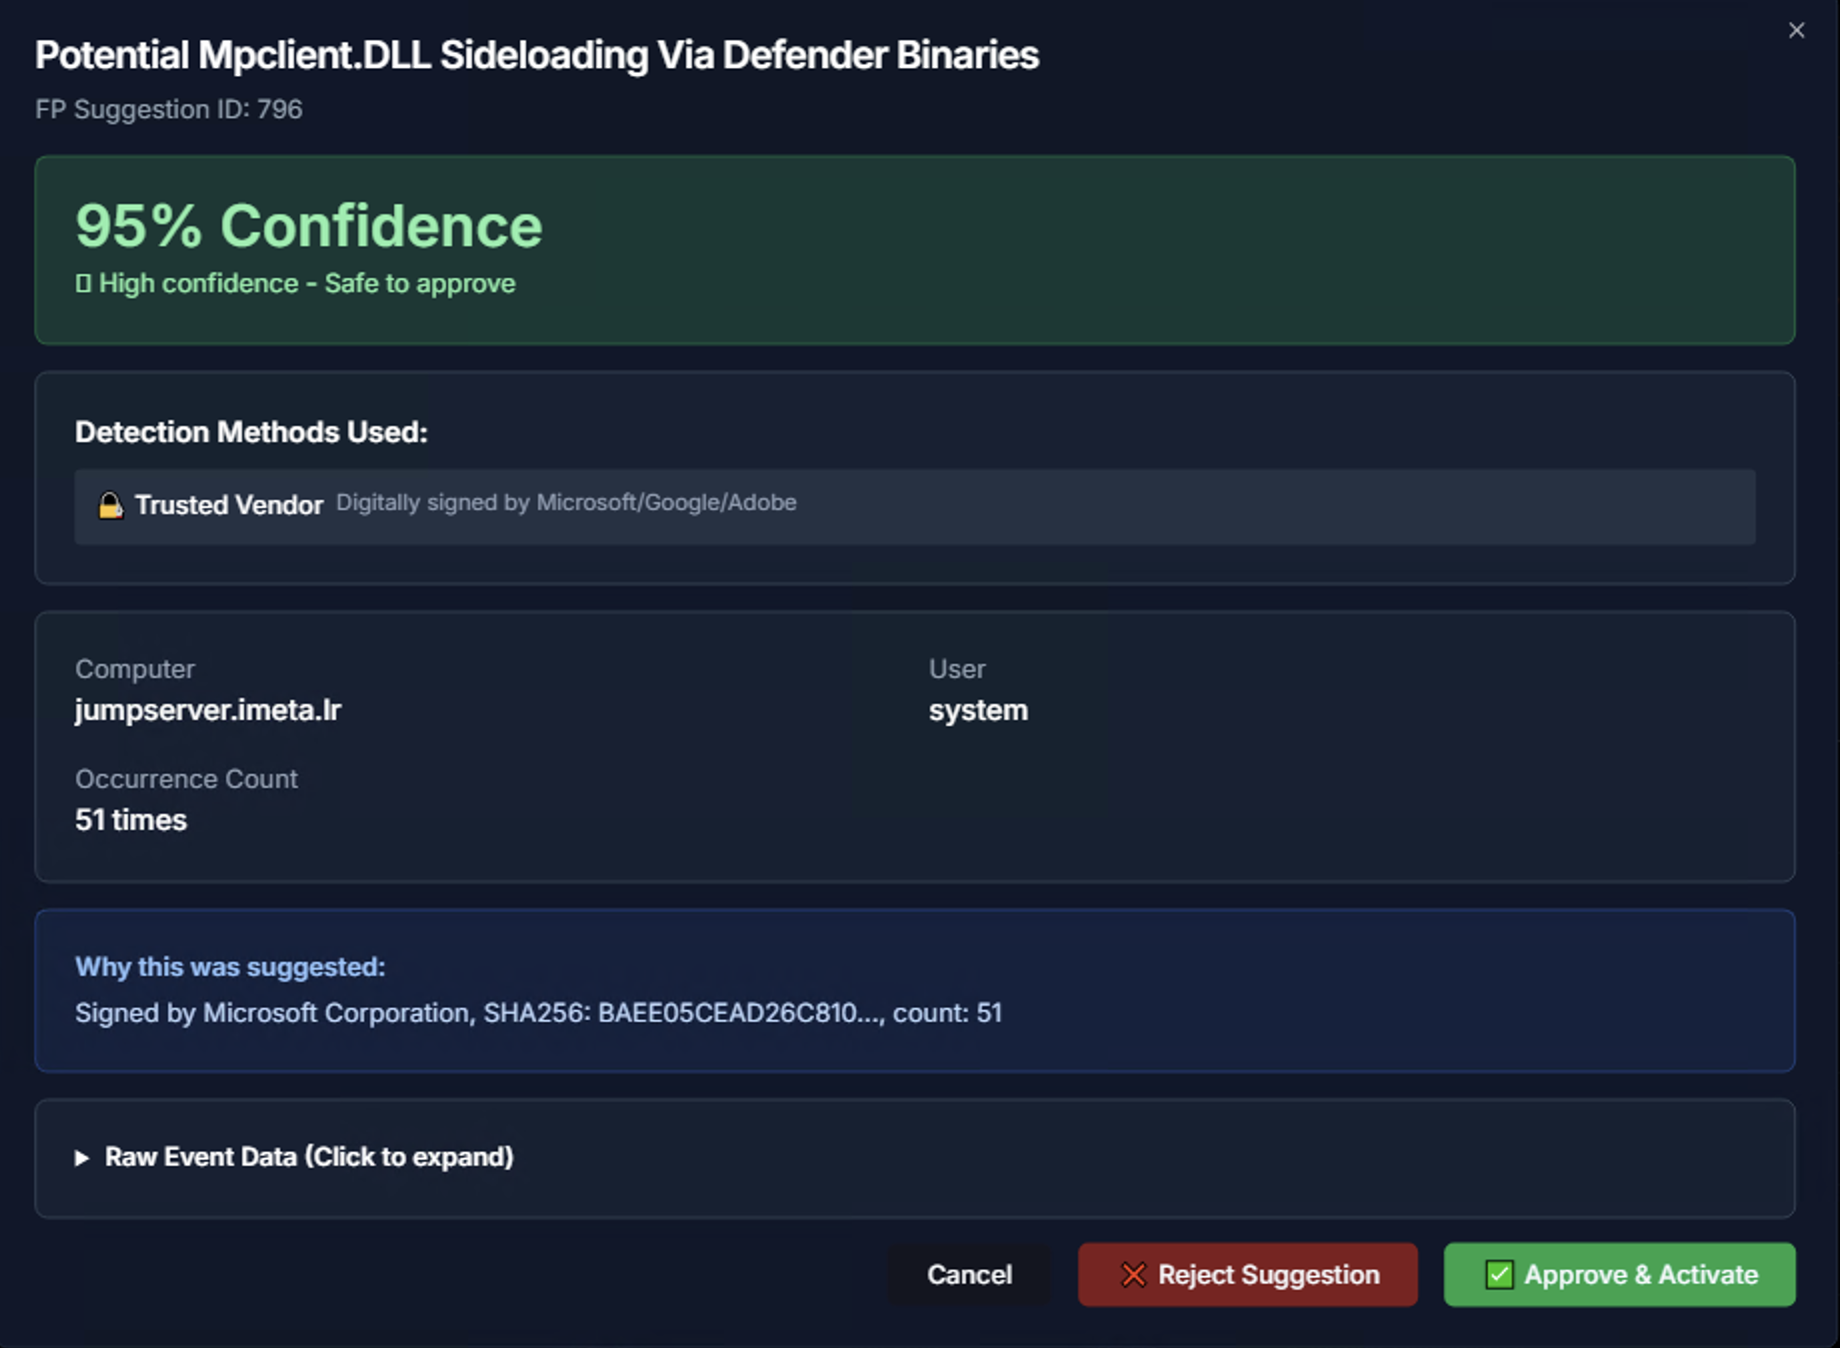
Click Details on any suggestion to see the full analysis:
| Section | What It Shows |
|---|---|
| Confidence Score | Large percentage display with confidence tier label (e.g., "95% Confidence — High confidence - Safe to approve") |
| Detection Methods Used | How the AI determined this is a false positive — e.g., Trusted Vendor (digitally signed by Microsoft/Google/Adobe) |
| Computer & User | The specific system and user account associated with the suggestion |
| Occurrence Count | How many times this alert has fired |
| Why this was suggested | Detailed explanation — e.g., "Signed by Microsoft Corporation, SHA256: BAEE05CEA..., count: 51" |
| Raw Event Data | Expandable section showing the original log event for manual verification |
After reviewing, choose:
- Approve & Activate — Creates a false positive rule and immediately begins suppressing matching alerts
- Reject Suggestion — Dismisses the suggestion without creating a rule
- Cancel — Returns to the suggestions list without taking action
Marking an Alert as False Positive
False positive rules can also be created directly from the investigation workflow without navigating to the False Positives Management console.
Step 1: Identify the Alert
From the Security Timeline Analysis view, click on an alert card to expand the Event Details table. Select an event row to open the Alert Detail Panel.
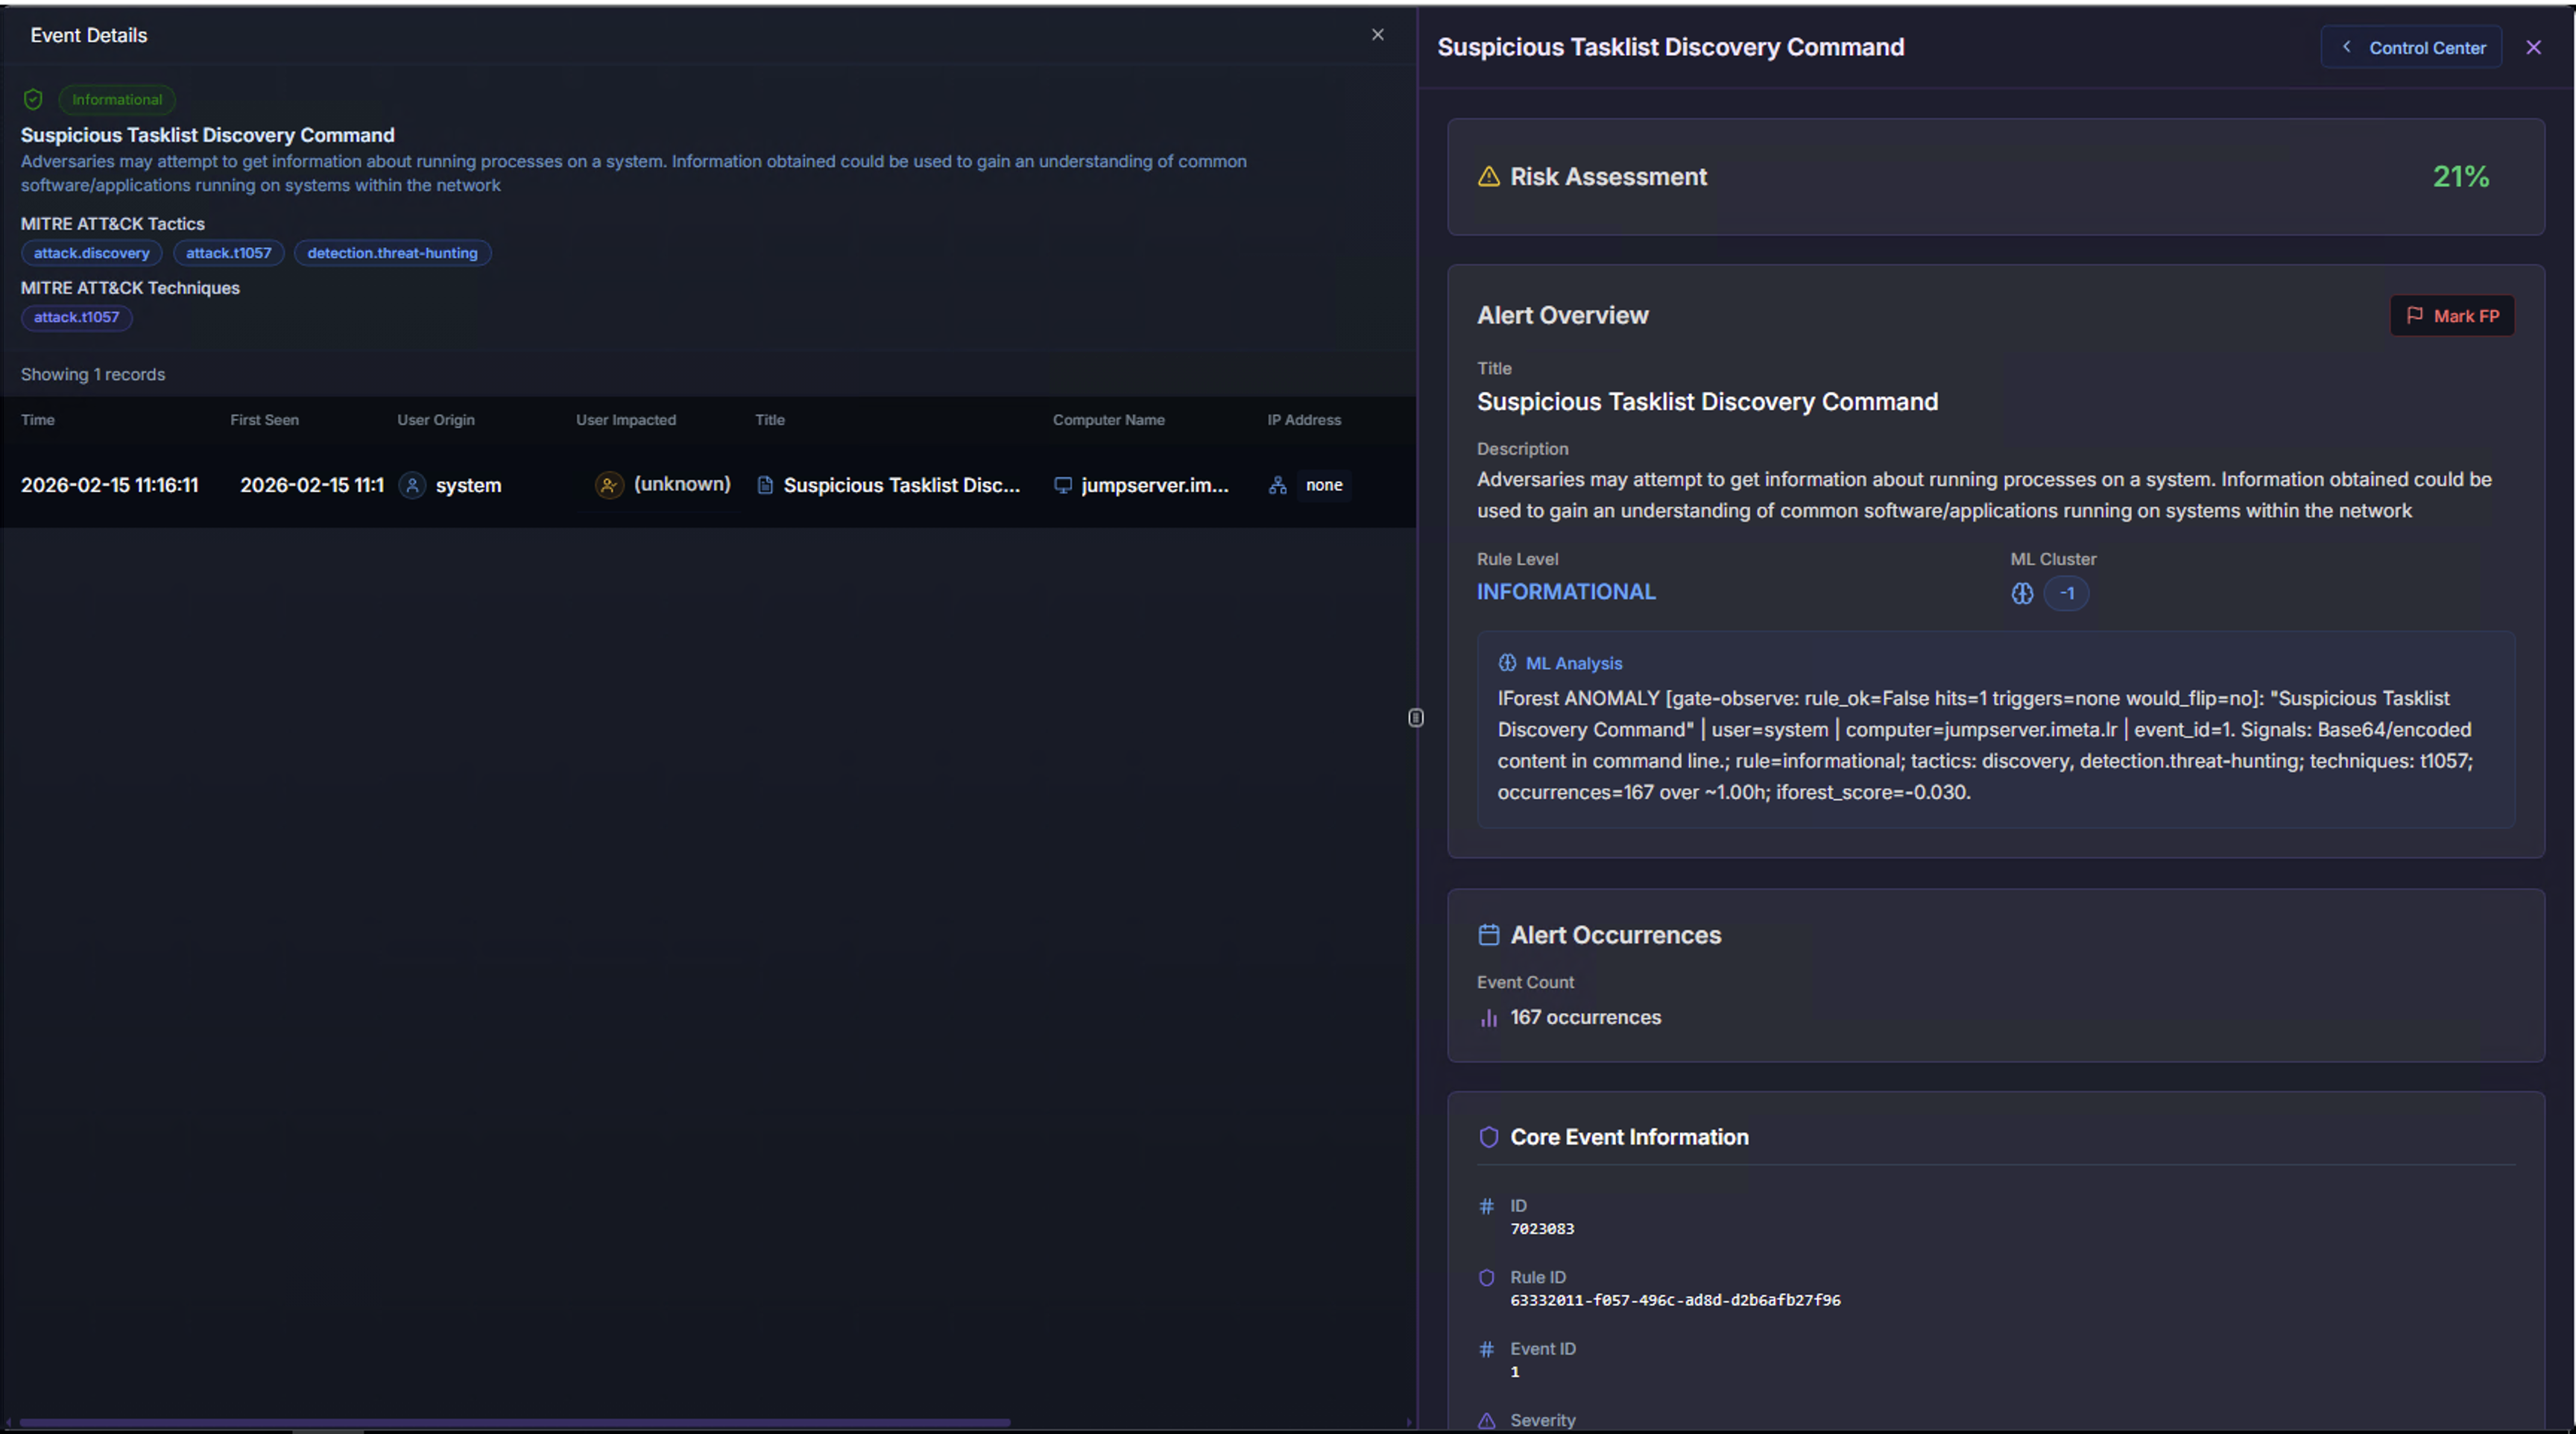
In the Alert Detail Panel, review the Risk Assessment, Alert Overview, and ML Analysis to confirm this is a false positive. Then click the Mark FP button in the Alert Overview section.
Step 2: Configure the False Positive Rule
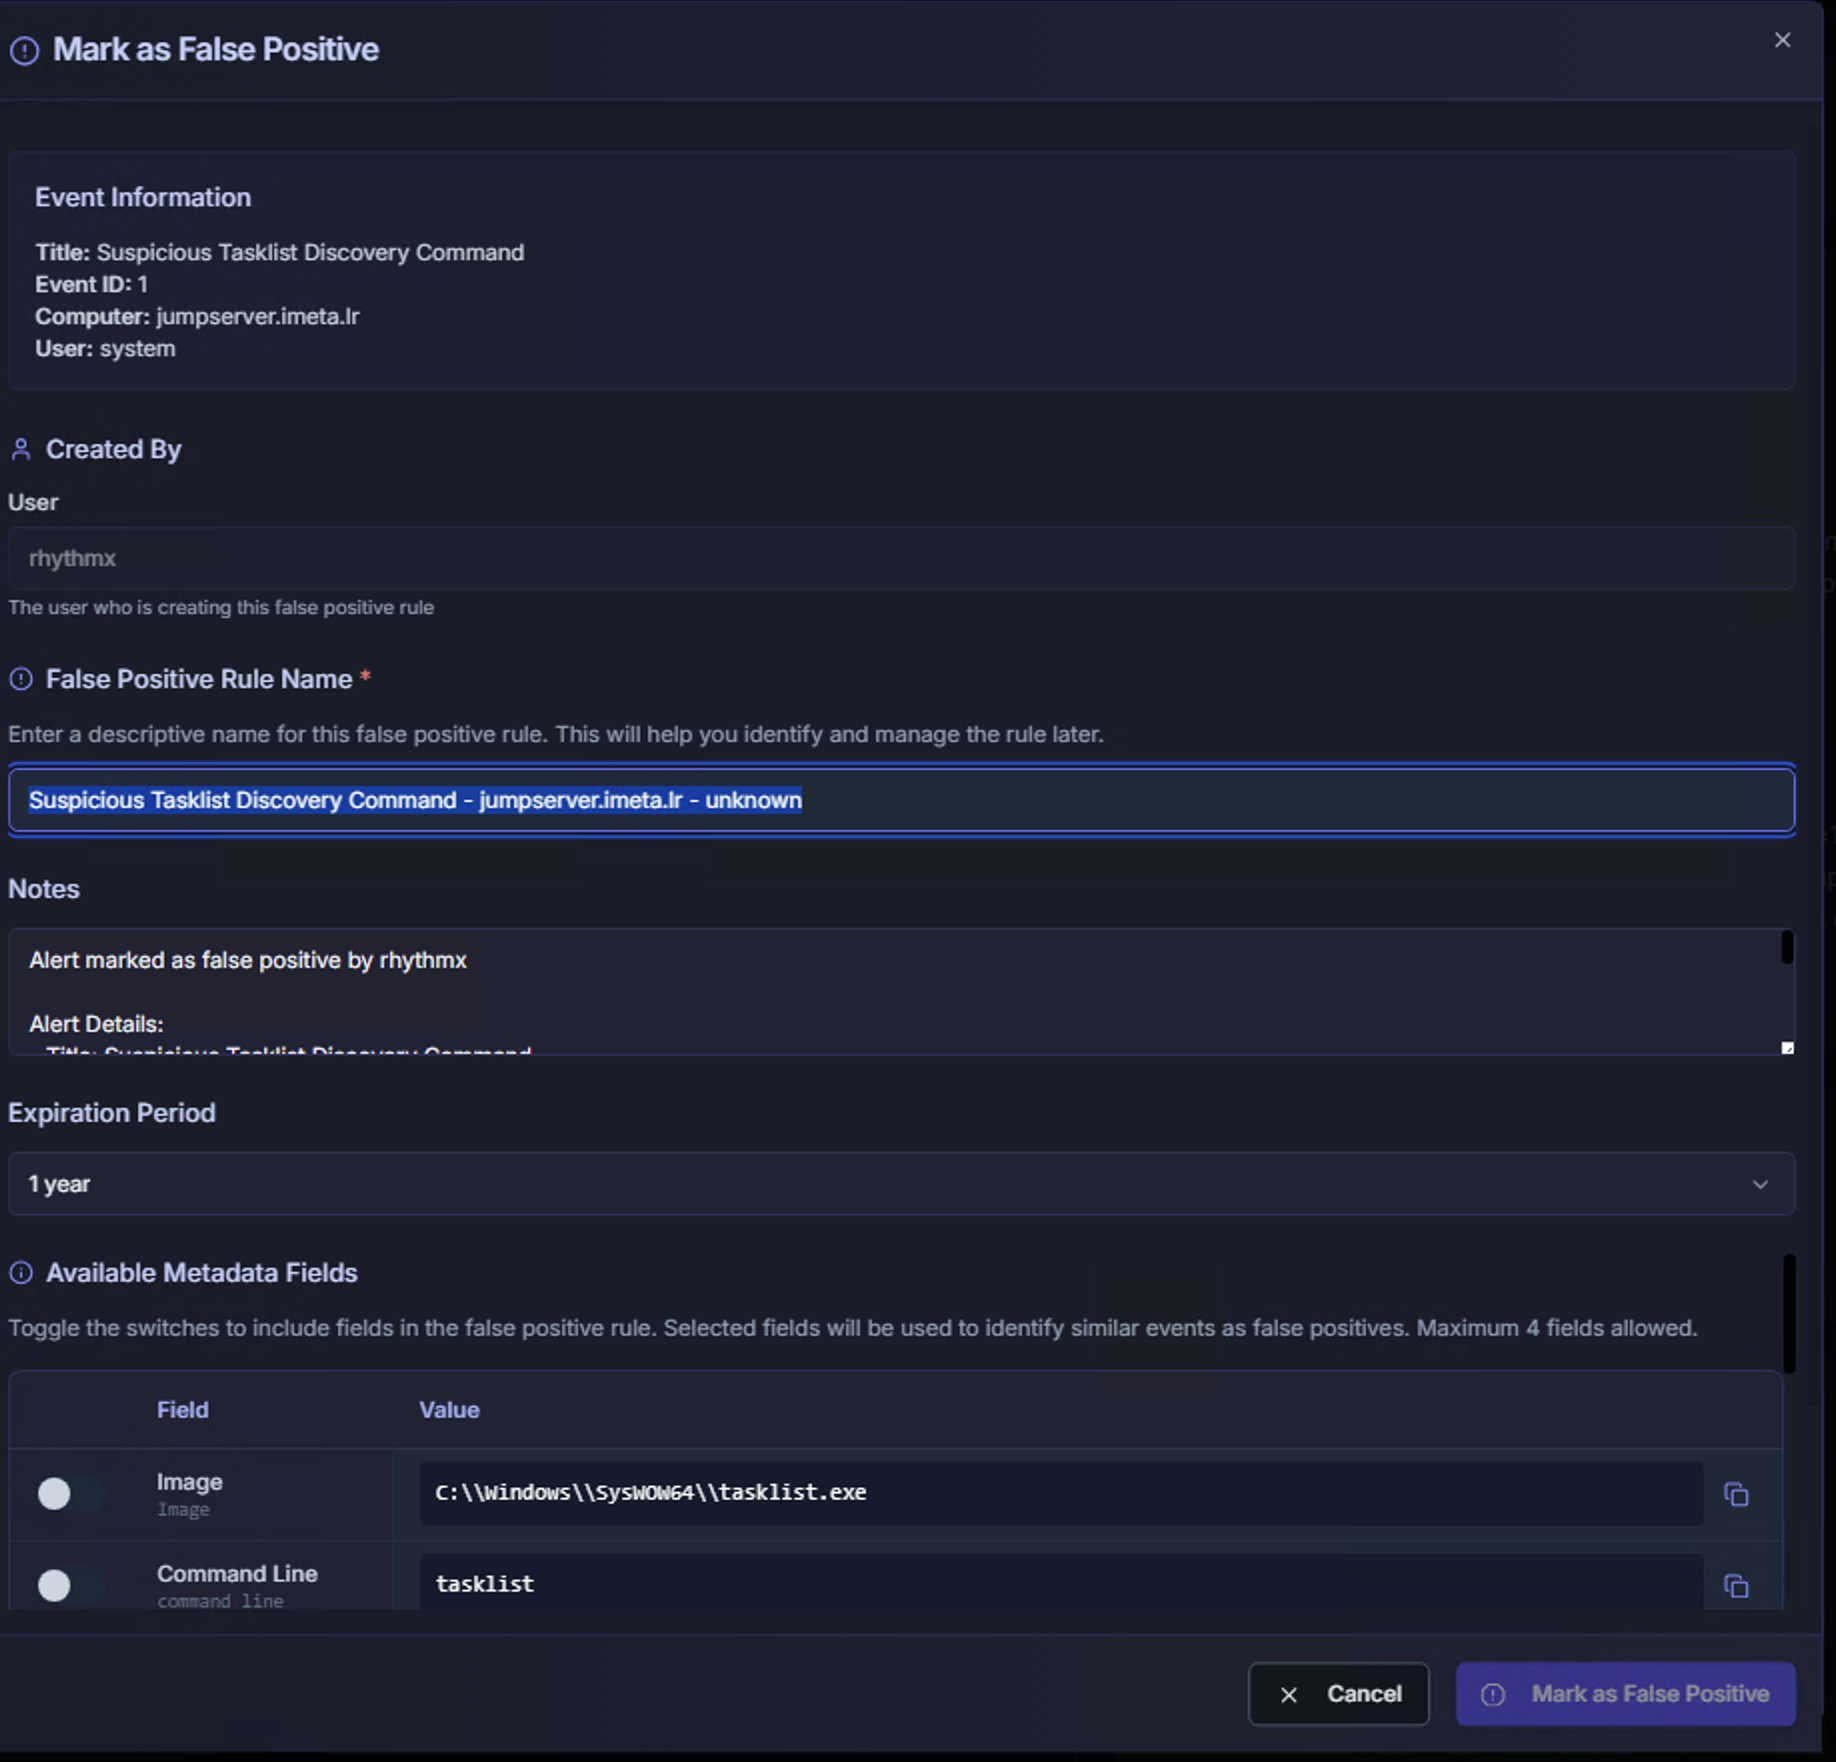
The Mark as False Positive dialog opens with the following fields:
| Field | Description |
|---|---|
| Event Information | Pre-populated summary showing the alert title, Event ID, Computer, and User — confirms which alert you are suppressing |
| Created By | The analyst creating this false positive rule |
| False Positive Rule Name | A descriptive name for the rule. Auto-generated from the alert title, computer, and user — editable to add context (e.g., "Scheduled maintenance task on jumpserver") |
| Notes | Free-text field for documenting why this is a false positive. Include justification so other analysts understand the reasoning |
| Expiration Period | How long the false positive rule remains active. Default is 1 year. After expiration, the alert will surface again for re-evaluation |
Step 3: Select Matching Fields

The Available Metadata Fields section controls how broadly the false positive rule applies. Toggle the fields that should be used to match future events:
| Field | Value Example | When to Include |
|---|---|---|
| Image | c:\windows\system32\tasklist.exe |
Include when the specific executable is known-good |
| Command Line | tasklist |
Include to match the exact command-line arguments |
| Target User Name | (unknown) |
Include to scope the rule to a specific target user |
| Task | Process Create (rule: ProcessCreate) |
Include to match a specific event type |
| Techniques | T1057 |
Include to suppress a specific MITRE ATT&CK technique for this context |
| Alert Title/Name | Suspicious Tasklist Discovery Command |
Include to match the specific Sigma rule by name |
| Unique Hash | Hash value | Include to match the exact process hash — most specific matching |
| User Id | system |
Include to scope the rule to a specific originating user |
Maximum 4 fields can be selected per false positive rule. This limit ensures rules remain specific enough to avoid accidentally suppressing true positives.
Matching Strategy
The fields you select determine the scope of the false positive rule:
| Strategy | Fields Selected | Effect |
|---|---|---|
| Broad | Alert Title only | Suppresses this Sigma rule for all users and systems — use with caution |
| Moderate | Alert Title + User Id | Suppresses this rule only when triggered by a specific user |
| Specific | Alert Title + Image + Command Line | Suppresses only when the exact executable and command match |
| Most Specific | Alert Title + Unique Hash + User Id + Image | Suppresses only the exact combination — safest approach |
Click Mark as False Positive to save the rule, or Cancel to return to the investigation.
Best Practices
| Practice | Why |
|---|---|
| Start with FP Suggestions | Let the AI do the heavy lifting — review and approve high-confidence suggestions first to quickly reduce noise |
| Use Frequent Alerts for bulk triage | Alerts firing thousands of times are almost always false positives — review the Frequent Alerts tab regularly |
| Always add notes | Document the reasoning so other analysts and auditors understand why the alert was suppressed |
| Use specific matching fields | Select 2–4 fields to avoid broad suppression. A rule matching only the alert title could hide real attacks |
| Set appropriate expiration | Use shorter expiration periods for temporary situations (e.g., maintenance windows). Re-evaluate expired rules to confirm they are still valid |
| Review before marking | Check the ML analysis and risk assessment first — an ML-flagged alert with a high risk score warrants deeper investigation before suppression |
| Coordinate with the team | If a rule is noisy across multiple entities, consider tuning or disabling the Sigma rule in the Rule Center instead of creating multiple false positive rules |